Part 2
Agenda
- Introduction to Version Control
- Benefits of Version Control
- Types of Version Control
- Introduction to GIT
- Understanding GIT Stages
- Branches and Merging
- Introduction to Azure Repos
- Different Merge Types in Azure Repos
- Branch Policies
- Branch Security
- Tag
- GIT Configuration related commands
- Git Reset
- Git log
- Git Revert
- Azure Repos Tasks with Solutions
Version Control
- Version control, also known as source control, is the practice of tracking and managing changes to software code.
- Version control software keeps track of every modification to the code in a special kind of database.
- Version control tracks every developer change and helps prevent concurrent work from conflicting.
Benefits of Version Control Systems (VCS)
-
Efficient Collaboration: Enables multiple developers to work on the same project simultaneously without overwriting each other’s changes.
-
Audit Trail: Provides detailed information about all changes, including Who, What, and When modifications were made.
-
Disaster Recovery: Facilitates easy recovery of previous versions of code in case of data loss or corruption.
-
Multiple Versions: Allows the management of multiple versions of a project, making it easier to maintain and develop parallel features.
-
Reduce Errors & Conflicts: Minimizes errors and conflicts that can arise from concurrent development efforts.
-
Global Contribution: Supports contributions from developers around the world, enhancing the project’s growth and innovation.
Type of VCS
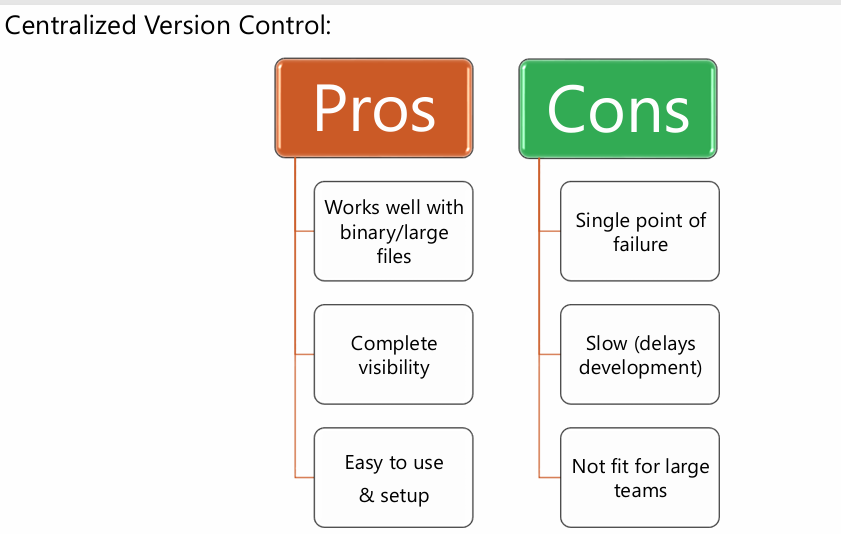
Centralized Version Control
- A centralized version control system offers software development teams a way to collaborate using a central server.
- Some common centralized version control systems include SVN, TFVC, etc.
Actions to Perform to Make Changes Visible:
- You Commit: Save your changes to the central server.
- They Update: Retrieve the latest changes from the central server to stay synchronized.

Distributed Version Control
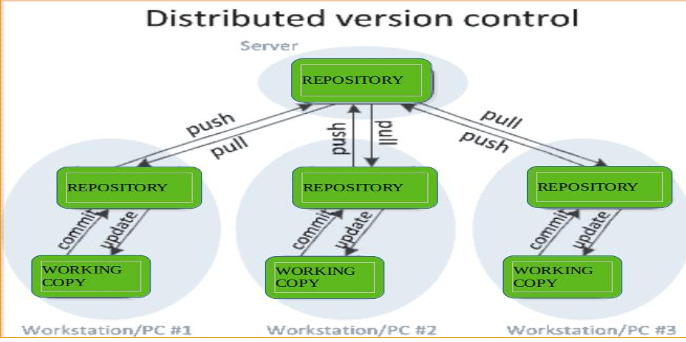
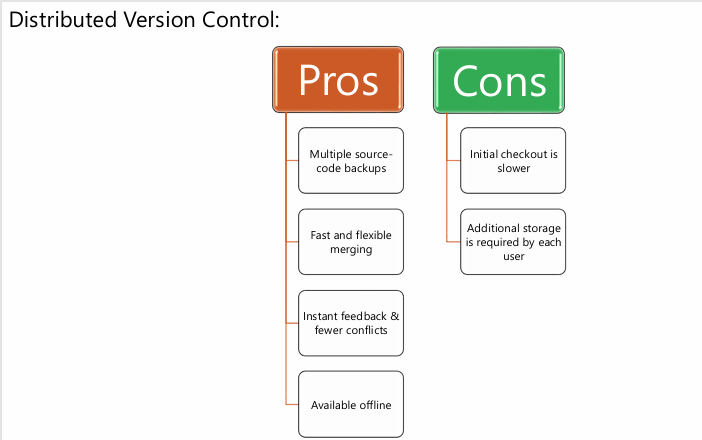
- Distributed version control systems contain multiple repositories, allowing for more flexible workflows.
- Each user has their own repository and working copy. Users need to pull to fetch the latest changes, while developers need to push their changes to update the remote repository.
- Some common distributed version control systems include GIT.
Actions to Perform to Make Changes Visible:
- You Commit: Save your changes to your local repository.
- You Push: Upload your committed changes to the remote repository.
- They Pull: Fetch the latest changes from the remote repository to their local repository.
- They Update: Synchronize their working copy with the latest changes from the remote repository.
GIT Overview
- Git is a distributed version control system used to track changes in source code during software development.
Key Features:
- Distributed: Every developer has a full copy of the repository, allowing for offline work and greater redundancy.
- Branching and Merging: Git makes it easy to create, manage, and merge branches, facilitating parallel development and experimentation.
- Speed: Git is designed for performance, enabling quick operations for version control tasks.
- Data Integrity: Git uses cryptographic hashing (SHA-1) to ensure the integrity of the code and its history.
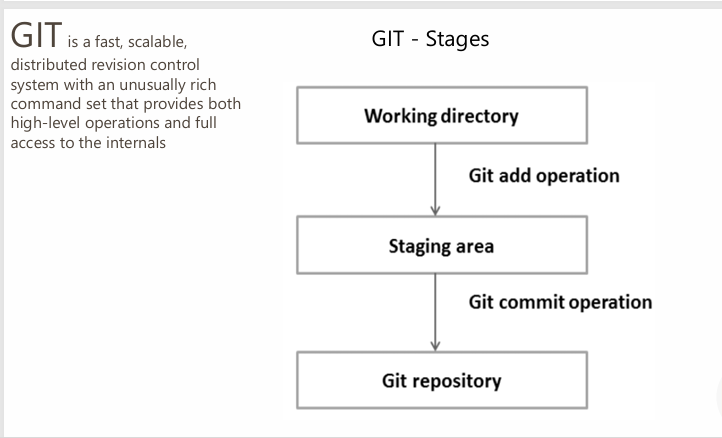
- Staging Area: Git includes a staging area (index) where changes can be reviewed before committing, allowing for greater control over what is included in a commit.
Common Commands:
git init: Initialize a new Git repository.git clone [url]: Create a copy of a remote repository.git add [file]: Stage changes for the next commit.git commit -m "[message]": Commit staged changes with a descriptive message.git push: Upload local commits to a remote repository.git pull: Fetch and integrate changes from a remote repository.
Use Cases:
- Collaboration: Git enables multiple developers to work on the same project simultaneously, reducing conflicts.
- Version Control: Track changes over time, allowing for easy rollback and history exploration.
- Open Source Projects: Widely used in the open-source community to manage contributions and collaborations.
Git is an essential tool for modern software development, providing powerful features for managing code and facilitating collaboration among teams.
GIT Stages
LAB 01
- Create Local Git repo
- Set git configuration
- user name
- Password
- Git Operations
- Git add
- Git commit
- Git status
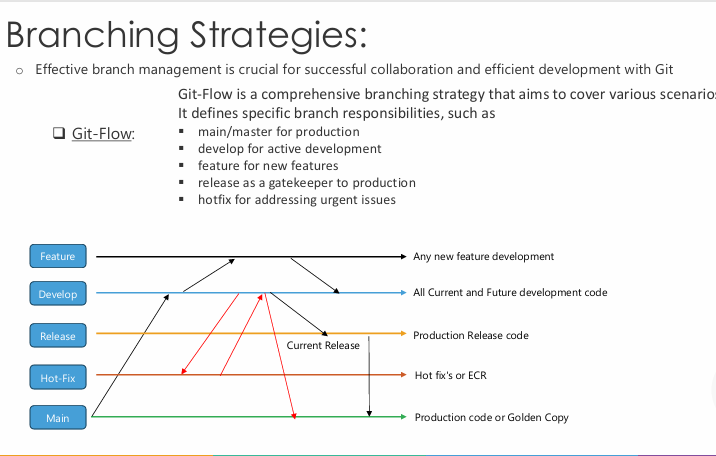
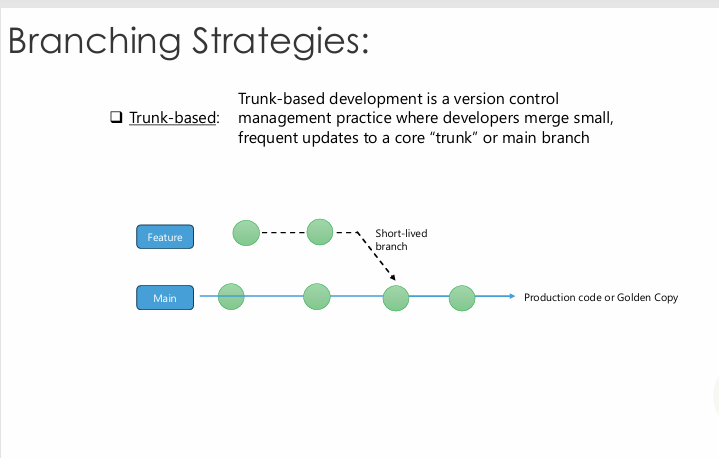
Branching and Merging in Git
Branching
- Definition: Branching in Git allows you to create separate lines of development within the same repository. This enables you to work on features, fixes, or experiments in isolation from the main codebase.
Key Features:
- Isolation: Each branch can have its own commits, enabling parallel development without affecting the main codebase.
- Easy Switching: You can switch between branches with a simple command, allowing you to move between features or fixes easily.
- Naming: Branches can be named according to the feature, bug fix, or task, improving organization and clarity.
Common Commands:
git branch [branch-name]: Creates a new branch.git checkout [branch-name]: Switches to the specified branch.git checkout -b [branch-name]: Creates and switches to a new branch in one command.
Merging
- Definition: Merging is the process of integrating changes from one branch into another. This typically involves combining the feature branch back into the main branch (often
mainormaster).
Key Features:
- Combine Work: Merging allows you to bring together changes made in different branches, consolidating efforts from multiple developers.
- Conflict Resolution: If there are conflicting changes in the branches being merged, Git will prompt you to resolve these conflicts manually.
Common Commands:
git merge [branch-name]: Merges the specified branch into the current branch.git merge --no-ff [branch-name]: Performs a merge that preserves the history of the merged branch.git rebase [branch-name]: Moves or combines a sequence of commits to a new base commit, providing a linear history.
Best Practices
- Feature Branching: Use branches for new features or bug fixes to keep the main branch stable.
- Regular Merging: Merge changes from the main branch into your feature branch regularly to minimize conflicts.
- Clear Commit Messages: Use descriptive commit messages to explain the purpose of the branch and the changes made.
Branching and merging are essential features of Git that facilitate collaboration and efficient code management, allowing teams to work simultaneously on different aspects of a project.
Azure Repos
- Azure Repos is a set of version control tools that you can use to manage your code.
- Azure Repos provides two types of version control:
- GIT
- TFVC (Team Foundation Version Control)
Merge Types in Azure Devops Repo
Merge (no fast-forward)
- It is the default integration strategy in Azure Repos, GitHub, and most other Git providers.
- All individual commits are preserved as-is, and a new merge commit is created.
- This strategy is helpful because it illustrates exactly how a developer (or developers) worked on a pull request, including each individual commit along the way.

Squash Commit
- In Squash, each pull request becomes a single commit in the master, resulting in no merges, just a simple, straight, linear history.
- Individual commits are lost, which is best for teams that use “fix-up” commits or do not carefully craft individual commits for review before pushing them.

Rebase
- Rebase will take each commit in the pull request and cherry-pick them onto the destination branch.
- When this strategy is used, history is straight and linear, similar to the “squash” option, but each commit is retained.

Semi-linear Merge
- It’s a mix of rebasing and merging.
- First, the commits in the pull request are rebased on top of the master branch. Then those rebased pull requests are merged into the destination branch.
- This strategy is best used for retaining individual commits and for viewing how the work evolved. Instead of just being rebased, a “merge bubble” is shown, allowing you to immediately see the work in each pull request.

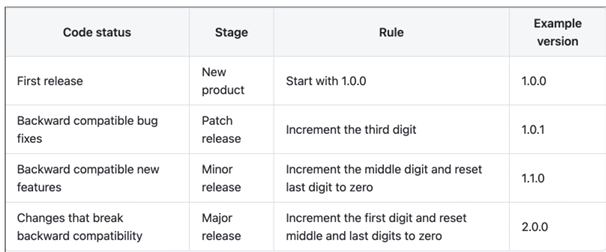
Semantic Versioning
- Semver is short for semantic versioning.
- Semantic Versioning is a standardized way to give meaning to your software releases.
- It provides a universal way of versioning software development projects and tracking the variations.
- SemVer is in the form of Major.Minor.Patch.
Cherry-Picking Concept
- Cherry-picking allows you to select specific commits from one branch and apply them to another branch. This is useful for applying bug fixes or features without merging the entire branch.
Repository Policies

Commit Author Email Validation
- Description: Blocks commits from authors whose email addresses don’t match specified patterns.
- Recommendation: Enable this to ensure all commits come from authorized users, maintaining accountability.
File Path Validation
- Description: Blocks pushes that introduce certain file paths.
- Recommendation: Enable this to prevent unwanted file types or directory structures from being added, helping to maintain a clean repository.
Case Enforcement
- Description: Prevents changes that only modify the case of file or folder names to avoid case sensitivity issues.
- Recommendation: Enable this to avoid conflicts in repositories used by developers on different operating systems.
Reserved Names
- Description: Blocks pushes that introduce names reserved by the platform or that contain incompatible characters.
- Recommendation: Enable this to prevent naming conflicts and ensure compliance with platform restrictions.
Maximum Path Length
- Description: Prevents the introduction of paths that exceed a specified length.
- Recommendation: Enable this to avoid issues with file systems that have path length limitations, particularly on Windows.
Maximum File Size
- Description: Blocks files that exceed a certain size limit.
- Recommendation: Enable this to prevent large files from being committed, which can bloat the repository and slow down operations.
Strict Vote Mode in Azure DevOps
Strict Vote Mode is a feature in Azure DevOps pull requests (PRs) that enforces stricter rules for code review approval. It requires all reviewers to approve the PR and blocks the merge if any reviewer rejects the PR until the issues are resolved.
What is Strict Vote Mode?
-
All reviewers must approve the PR before it can be completed.
-
Any rejecting vote (e.g., “Rejected” or “Waiting for Author”) must be resolved before the PR can be merged.
This ensures that code cannot be merged until all concerns are addressed and all reviewers approve the changes.
Enabling Strict Vote Mode
-
Navigate to the repository:
- Go to the Azure DevOps project.
- Click on Repos to access the repository settings.
-
Access Pull Request Policies:
- Go to Project Settings (bottom left).
- Select Repositories, then choose the repository you want to configure.
- Select Branch Policies for the branch you want to enforce (e.g.,
main,develop).
-
Configure Required Reviewers:
- Enable Required Reviewers in the branch policies.
- Add the reviewers and set the number of required approvals.
-
Enable Strict Vote Mode:
- In the branch policy settings, enable Check for linked work items and/or Check for comment resolution to ensure all conditions are met before merging.
- Optionally, enable Reset code reviewer votes if additional commits are pushed to the PR. This will require fresh reviews for new changes.
Benefits of Strict Vote Mode
- Ensures full code review: PRs cannot be merged without the approval of all reviewers.
- Prevents premature merges: A rejecting vote blocks the merge until issues are resolved.
- Promotes collaboration: All team members involved in the review process must approve the changes.
Strict Vote Mode helps maintain high code quality by enforcing a thorough revie
Suggested Actions
- Review the implications of enabling each policy for your team’s workflow.
- Customize the patterns or limits according to your project requirements.
- Communicate any changes to these policies with your team, as they may impact their workflow.
Branch Policies
- Branch policies are rules that enforce certain practices for branches. They can include requirements for code reviews, successful builds, and more, ensuring that the code meets specific quality standards before being merged.
Note: If any required policy is enabled, this branch cannot be deleted and changes must be made via pull request.
Current Policies
-
Require a Minimum Number of Reviewers:
- Status: Off
- Description: Require approval from a specified number of reviewers on pull requests.
-
Check for Linked Work Items:
- Status: Off
- Description: Encourage traceability by checking for linked work items on pull requests.
-
Check for Comment Resolution:
- Status: Off
- Description: Check to see that all comments have been resolved on pull requests.
-
Limit Merge Types:
- Description: Control branch history by limiting the available types of merge when pull requests are completed.
Automatically Included Reviewers
- Current Status: 0
- Description: Designate code reviewers to automatically include when pull requests change certain areas of code.
- Filter: No automatic reviewer policies found, but you can use the add button to create one!
Branch Security
- Branch security involves setting permissions to control who can access and modify specific branches. This helps protect important branches from unauthorized changes and enforces collaboration practices.
Tag
- A tag is a reference to a specific point in the repository’s history. Tags are typically used to mark release points (e.g., v1.0, v2.0) and help track significant versions of the software.
GIT Configuration related commands
- [Check the current configuration
git config -l
- configure user name for git
git config --global user.name "Sarah Smith"
- configure Email for git
git config --global user.email "email"
- configure default editor git
git config --global core.editor "nano"
- configure Alias for git
git config --global alias.co commit
Git Reset
Git Reset is a command that allows you to undo changes in your Git repository. It can be used to reset the current HEAD to a specified state, affecting the staging area and the working directory based on the chosen options.
Key Features
- Modify Commit History: Resetting can change the commit history by moving the HEAD pointer to a previous commit.
- Unstage Files: It can unstage files from the staging area, reverting them to the working directory.
- Discard Changes: Depending on the mode used, it can discard changes in the working directory.
Common Modes of Git Reset
-
Soft Reset (
--soft)- Moves the HEAD to a specified commit but leaves the changes staged.
- Command:
git reset --soft [commit] - Use Case: Useful for undoing a commit while keeping the changes for further editing or recommitting.
-
Mixed Reset (
--mixed) (default)- Moves the HEAD to a specified commit and unstages the changes, leaving them in the working directory.
- Command:
git reset --mixed [commit]or simplygit reset [commit] - Use Case: Useful for uncommitting changes while keeping them for further modifications.
-
Hard Reset (
--hard)- Moves the HEAD to a specified commit and discards all changes in the working directory and staging area.
- Command:
git reset --hard [commit] - Use Case: Useful for completely discarding changes and resetting to a clean state.
Important Considerations
- Data Loss: Using
--hardwill permanently delete uncommitted changes. Use with caution. - Shared Branches: Avoid resetting commits that have been shared with others, as it can cause discrepancies in the repository.
Example Commands
- Reset to a specific commit (soft):
git reset --soft HEAD~1
Azure Repos Tasks with Solutions
Create a New Repository
- Steps:
- Go to your Azure DevOps organization.
- Select the project.
- Click on “Repos” in the left menu.
- Click on “New Repository.”
- Enter the repository name and type (Git or TFVC).
- Click “Create.”
Clone a Repository
- Steps:
- Navigate to the repository.
- Click on “Clone.”
- Copy the URL.
- Open terminal and run
git clone <repository-url>.
Commit Changes
- Steps:
- Modify files in your local repo.
- Run
git add .to stage changes. - Run
git commit -m "Your message".
Push Changes to Remote
- Steps:
- Run
git push origin <branch-name>.
- Run
Create a Branch
- Steps:
- Run
git checkout -b <new-branch-name>.
- Run
Merge a Branch
- Steps:
- Switch to the target branch:
git checkout main. - Run
git merge <branch-name>.
- Switch to the target branch:
Resolve Merge Conflicts
- Steps:
- Open conflicting files, resolve conflicts.
- Stage resolved files:
git add <file-name>. - Commit:
git commit.
Delete a Local Branch
- Steps:
- Run
git branch -d <branch-name>.
- Run
Delete a Remote Branch
- Steps:
- Run
git push origin --delete <branch-name>.
- Run
1 View Commit History
- Steps:
- Run
git log.
- Run
View a Specific Commit
- Steps:
- Run
git show <commit-hash>.
- Run
Set Up Branch Policies
- Steps:
- Go to “Project settings.”
- Under “Repos,” select “Branches.”
- Click on the branch and select “Branch policies.”
- Configure as needed.
Create a Pull Request
- Steps:
- Go to “Pull Requests.”
- Click “New Pull Request.”
- Select branches, add title and description, then click “Create.”
Review a Pull Request
- Steps:
- Go to “Pull Requests.”
- Click on the PR.
- Review changes and approve or request changes.
Revert a Commit
- Steps:
- Find the commit hash with
git log. - Run
git revert <commit-hash>.
- Find the commit hash with
Pull Remote Changes
- Steps:
- Run
git pull origin <branch-name>.
- Run
Add a Remote Repository
- Steps:
- Run
git remote add <remote-name> <repository-url>.
- Run
Rename a Branch
- Steps:
- Run
git branch -m <old-branch-name> <new-branch-name>.
- Run
Check Out a Specific Commit
- Steps:
- Run
git checkout <commit-hash>.
- Run
Tag a Commit
- Steps:
- Run
git tag -a <tag-name> -m "Tag message". - Push tags:
git push origin --tags.
- Run
Delete a Tag
- Steps:
- Run
git tag -d <tag-name>. - Delete from remote:
git push origin --delete <tag-name>.
- Run
Create a Fork of a Repository
- Steps:
- Navigate to the repository.
- Click on “Fork” to create your copy.
Show Differences Between Commits
- Steps:
- Run
git diff <commit1> <commit2>.
- Run
Show Changes in Staged Files
- Steps:
- Run
git diff --cached.
- Run
Configure Git User Information
- Steps:
- Run
git config --global user.name "Your Name". - Run
git config --global user.email "your.email@example.com".
- Run
Set Up SSH for Authentication
- Steps:
- Generate an SSH key:
ssh-keygen. - Add the public key to your Azure DevOps account under “SSH public keys.”
- Generate an SSH key:
View Branch List
- Steps:
- Run
git branchfor local branches. - Run
git branch -rfor remote branches.
- Run
Stash Changes
- Steps:
- Run
git stashto save changes temporarily. - Run
git stash applyto reapply stashed changes.
- Run
Create a .gitignore File
- Steps:
- Create a file named
.gitignorein your repository. - Add file patterns to ignore (e.g.,
*.log).
- Create a file named
Check the Status of Your Repository
- Steps:
- Run
git statusto view changes.
- Run
Amend the Last Commit
- Steps:
- Make changes to your files.
- Run
git add .. - Run
git commit --amend.
Compare Branches
- Steps:
- Run
git diff <branch1>..<branch2>.
- Run
Set Default Branch
- Steps:
- Go to “Project settings.”
- Under “Repos,” select “Branches.”
- Set the default branch for your project.
Create a Code Review Template
- Steps:
- Go to “Project settings” > “Repositories.”
- Set up policies or guidelines for code reviews.
Link Work Items to Commits
- Steps:
- Include the work item ID in your commit message (e.g., “Fixes #123”).
Create a Release Branch
- Steps:
- Run
git checkout -b release/<version-number>.
- Run
Cherry-Pick a Commit
- Steps:
- Run
git cherry-pick <commit-hash>.
- Run
Set Up Pull Request Approvers
- Steps:
- Go to “Branch policies” for the desired branch.
- Under “Required reviewers,” add users who must approve PRs.
Set Up Pull Request Reviewers
- Steps:
- In the same “Branch policies” section, add users to the “Reviewer” list.
Configure CI/CD Pipeline with Repos
- Steps:
- Go to “Pipelines” and create a new pipeline.
- Link it to your Azure Repo.
Monitor Repository Insights
- Steps:
- Go to “Insights” in your repository to view activity.
Import a Repository
- Steps:
- Go to “Repos” and click “Import repository.”
- Provide the source repository URL.
Create Multiple Pull Requests
- Steps:
- Create branches for different features.
- Open pull requests for each branch.
Use Squash Merges
- Steps:
- In the pull request, select “Squash merge” before completing the PR.
Enable Git LFS (Large File Storage)
- Steps:
- Install Git LFS on your machine.
- Run
git lfs installand track large files usinggit lfs track "*.largefile".
Set Up Pull Request Merge Strategies
- Steps:
- Go to “Branch policies.”
- Choose merge strategies (e.g., rebase, merge commit, squash) as per your workflow.
Configure Repository Settings
- Steps:
- Go to “Project settings.”
- Under “Repos,” configure settings like permissions, security, and policies.
Git Config Commands
Set Global Username
- Command:
git config --global user.name "Your Name" - Description: Sets the username that will be associated with your commits.
Set Global Email
- Command:
git config --global user.email "your.email@example.com" - Description: Sets the email that will be associated with your commits.
Set Default Text Editor
- Command:
git config --global core.editor "your-editor" - Description: Specifies the default text editor for Git commit messages (e.g.,
nano,vim,code).
View Configuration
- Command:
git config --list - Description: Displays a list of all Git configuration settings.
Set Color Output
- Command:
git config --global color.ui auto - Description: Enables color output for Git commands.
Set Default Branch Name
- Command:
git config --global init.defaultBranch main - Description: Sets the default branch name for new repositories (e.g.,
maininstead ofmaster).
Set Up Aliases
- Command:
git config --global alias.co checkout - Description: Creates an alias for commonly used commands (e.g.,
git coforgit checkout).
Configure Credential Helper
- Command:
git config --global credential.helper cache - Description: Caches your credentials in memory for use by future Git commands.
Enable Git LFS (Large File Storage)
- Command:
git lfs install - Description: Initializes Git LFS in your repository.
Set Push Default Behavior
- Command:
git config --global push.default simple - Description: Configures how
git pushbehaves (e.g.,simple,matching,current).
Set Ignore File Globally
- Command:
git config --global core.excludesfile ~/.gitignore_global - Description: Specifies a global ignore file for untracked files.
Set Fetch and Push Behavior
- Command:
git config --global fetch.prune true - Description: Automatically prunes deleted branches during fetch.
Change Local Repository Config
- Command:
git config user.name "Local Name" - Description: Sets the username for the current repository only (without
--global).
View Specific Configuration
- Command:
git config user.name - Description: Displays the configured username for the current repository.
Remove a Configuration
- Command:
git config --global --unset user.name - Description: Removes the specified configuration setting.
Get Help
- Command:
git help config - Description: Displays help documentation for Git configuration.
Git Log Commands
View Commit History
- Command:
git log - Description: Displays the commit history for the current branch.
View a Specific Number of Commits
- Command:
git log -n <number> - Description: Shows the last
<number>of commits (e.g.,git log -5for the last 5 commits).
View One Line Per Commit
- Command:
git log --oneline - Description: Displays the commit history in a condensed format, showing each commit on a single line.
View Commit History with Graph
- Command:
git log --graph - Description: Displays the commit history as a graph.
View Commit History with Specific File
- Command:
git log -- <file> - Description: Shows the commit history for a specific file.
View Commits by Author
- Command:
git log --author="Author Name" - Description: Filters commits to show only those made by the specified author.
View Commits Within a Date Range
- Command:
git log --since="YYYY-MM-DD" --until="YYYY-MM-DD" - Description: Filters commits to show those made within the specified date range.
View Commits with Detailed Information
- Command:
git log -p - Description: Displays the commit history along with the diff for each commit.
View Commits with Statistics
- Command:
git log --stat - Description: Shows the commit history along with the statistics of changes (insertions/deletions).
Search Commit Messages
- Command:
git log --grep="search-term" - Description: Filters commits to show only those with commit messages that match the specified search term.
View Commits for a Specific Branch
- Command:
git log <branch-name> - Description: Displays the commit history for a specific branch.
Show Commit Information for a Specific Commit
- Command:
git show <commit-hash> - Description: Displays detailed information about a specific commit.
View Commit History in Reverse Order
- Command:
git log --reverse - Description: Displays the commit history in reverse order, showing the oldest commits first.
Limit Output by Committer
- Command:
git log --committer="Committer Name" - Description: Filters commits to show only those made by the specified committer.
Format Output of Git Log
- Command:
git log --pretty=format:"%h - %an, %ar : %s" - Description: Customizes the output format of the log (e.g., showing hash, author name, date, and subject).
View Logs with Relative Dates
- Command:
git log --relative-date - Description: Displays commit dates in a more human-readable format (e.g., “2 weeks ago”).
View Logs with a Specific Path
- Command:
git log --follow <file> - Description: Follows the history of a file, even if it was renamed.
Combine Options
- Command:
git log --oneline --graph --decorate - Description: Combines multiple options for a more informative and visual representation of the commit history.
Git Reset Commands
Soft Reset
- Command:
git reset --soft <commit> - Description: Resets the current branch to the specified commit, keeping changes in the staging area.
Mixed Reset (Default)
- Command:
git reset <commit> - Description: Resets the current branch to the specified commit, keeping changes in the working directory but removing them from the staging area.
Hard Reset
- Command:
git reset --hard <commit> - Description: Resets the current branch to the specified commit, discarding all changes in the working directory and staging area.
Reset to HEAD
- Command:
git reset HEAD - Description: Unstages all changes in the staging area but keeps them in the working directory.
Reset to Specific File
- Command:
git reset <file> - Description: Unstages the specified file from the staging area while keeping changes in the working directory.
Reset to Previous Commit
- Command:
git reset HEAD~1 - Description: Resets the current branch to the previous commit, keeping changes in the working directory (similar to mixed reset).
Reset to a Specific Commit with Hard Option
- Command:
git reset --hard <commit> - Description: Resets the branch and discards all changes since the specified commit.
Reset with a Message
- Command:
git reset --mixed -m "Reset message" - Description: Resets the branch with a message (useful in scripts).
Undo Last Commit (Keep Changes)
- Command:
git reset --soft HEAD~1 - Description: Undoes the last commit but keeps the changes staged.
Undo Last Commit (Discard Changes)
- Command:
git reset --hard HEAD~1 - Description: Undoes the last commit and discards all changes made in that commit.
Reset to Remote State
- Command:
git reset --hard origin/main - Description: Resets the current branch to match the remote branch, discarding local changes.
Check Status After Reset
- Command:
git status - Description: Checks the status of the working directory after a reset operation.
Git Revert Commands
Revert a Commit
- Command:
git revert <commit> - Description: Creates a new commit that undoes the changes made in the specified commit.
Revert Multiple Commits
- Command:
git revert <commit1>..<commit2> - Description: Reverts all commits between the specified commits, creating new commits for each.
Revert to HEAD
- Command:
git revert HEAD - Description: Reverts the latest commit and creates a new commit with the inverse changes.
Git Merge Commands
Merge a Branch
- Command:
git merge <branch> - Description: Merges the specified branch into the current branch.
Fast-Forward Merge
- Command:
git merge --ff <branch> - Description: Performs a fast-forward merge if possible; otherwise, it creates a merge commit.
No Fast-Forward Merge
- Command:
git merge --no-ff <branch> - Description: Merges the specified branch into the current branch and creates a merge commit even if a fast-forward merge is possible.
Merge with a Commit Message
- Command:
git merge <branch> -m "Merge message" - Description: Merges the specified branch and includes a custom commit message.
Abort a Merge
- Command:
git merge --abort - Description: Aborts the merge process and returns to the state before the merge began.
View Merge Conflicts
- Command:
git status - Description: Checks for any merge conflicts after a merge attempt.
Git Tag Commands
Create a Tag
- Command:
git tag <tag-name> - Description: Creates a lightweight tag at the current commit.
Create an Annotated Tag
- Command:
git tag -a <tag-name> -m "Tag message" - Description: Creates an annotated tag with a message at the current commit.
List Tags
- Command:
git tag - Description: Lists all tags in the repository.
Show Tag Details
- Command:
git show <tag-name> - Description: Displays details about the specified tag.
Push Tags to Remote
- Command:
git push origin <tag-name> - Description: Pushes a specific tag to the remote repository.
Push All Tags to Remote
- Command:
git push --tags - Description: Pushes all tags to the remote repository.
Delete a Tag
- Command:
git tag -d <tag-name> - Description: Deletes a local tag.
Delete a Remote Tag
- Command:
git push --delete origin <tag-name> - Description: Deletes a tag from the remote repository.