Part 3
Agenda
- Azure Devops Pipeline
- Classical Pipeline
- Variables
- Triggers
- History
- Additional Optional
- Yaml Based Pipeline
- Classical Pipeline
Push the Sample Application to Repo
- DevOps Portal → Create a Project (HelloWorldApp)
- Project → Repo → Files → Copy Clone URL to Clipboard
- In your terminal, run the following commands:
git clone <Paste the URL> - Navigate to the directory:
cd HelloWorldApp - Create a new solution file:
dotnet new sln -o HelloWorldApp - Navigate to the directory:
cd HelloWorldApp - Create a new MVC application:
dotnet new mvc -n HelloWorldApp.Web - Add the project to the solution:
dotnet sln HelloWorldApp.sln add HelloWorldApp.Web/HelloWorldApp.Web.csproj - Stage the changes:
git add . - Commit the changes:
git commit -m "Initial Commit" - Push the changes to the repository:
git push origin master - Switch back to the web portal and view the committed files.
- Build the project locally to test first
dotnet build - Run the Application Locally (optional to use urls if the port 5000 is in use)
 cd HelloWorldApp.Web/
 dotnet bin/Debug/net8.0/HelloWorldApp.Web.dll --urls "http://localhost:5001"
Create ASP Net project using visual studio 2022
Open visual studio code and select as below
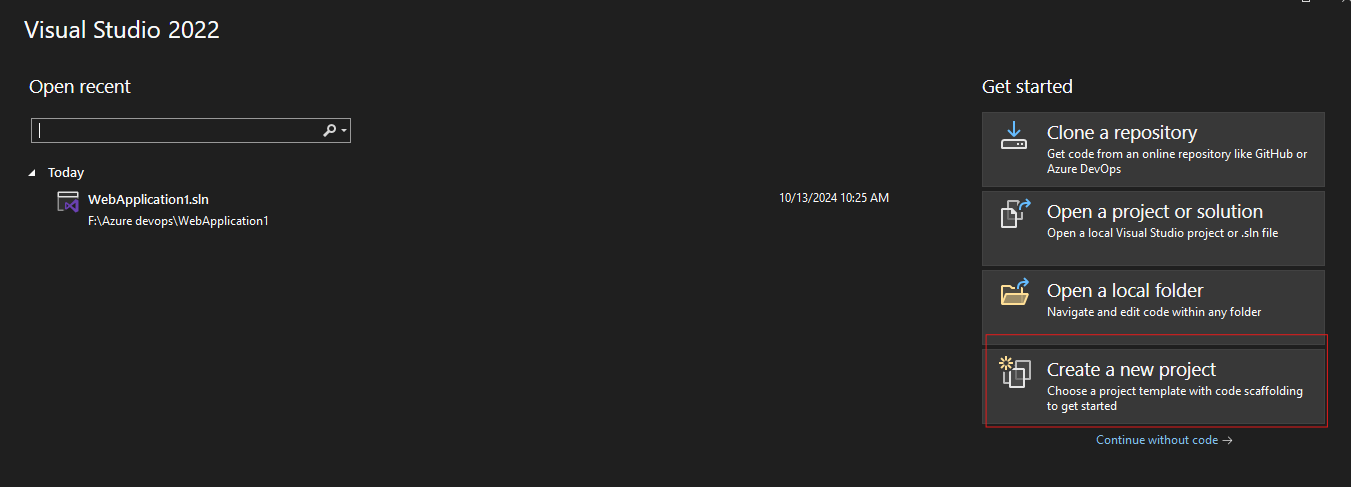
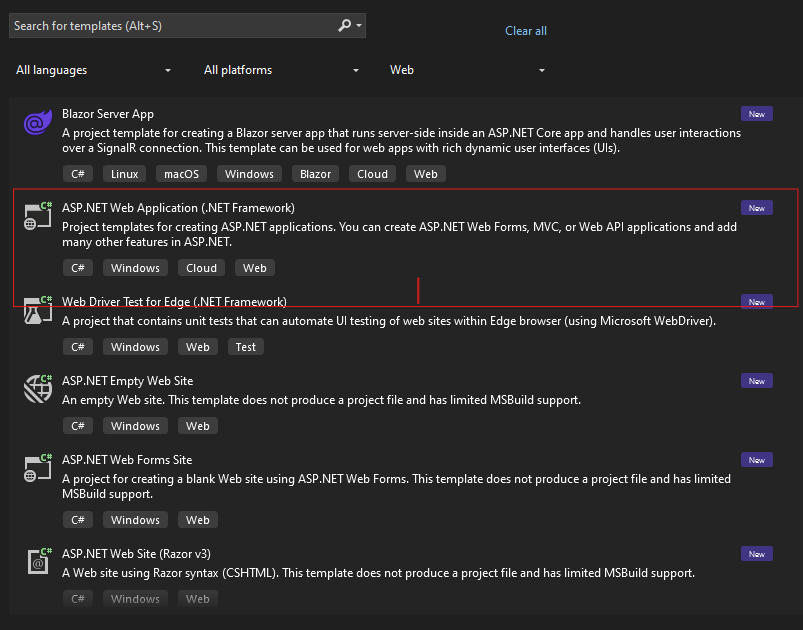
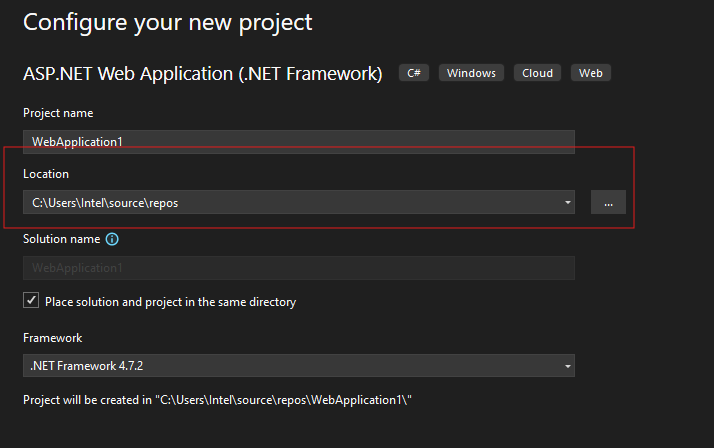
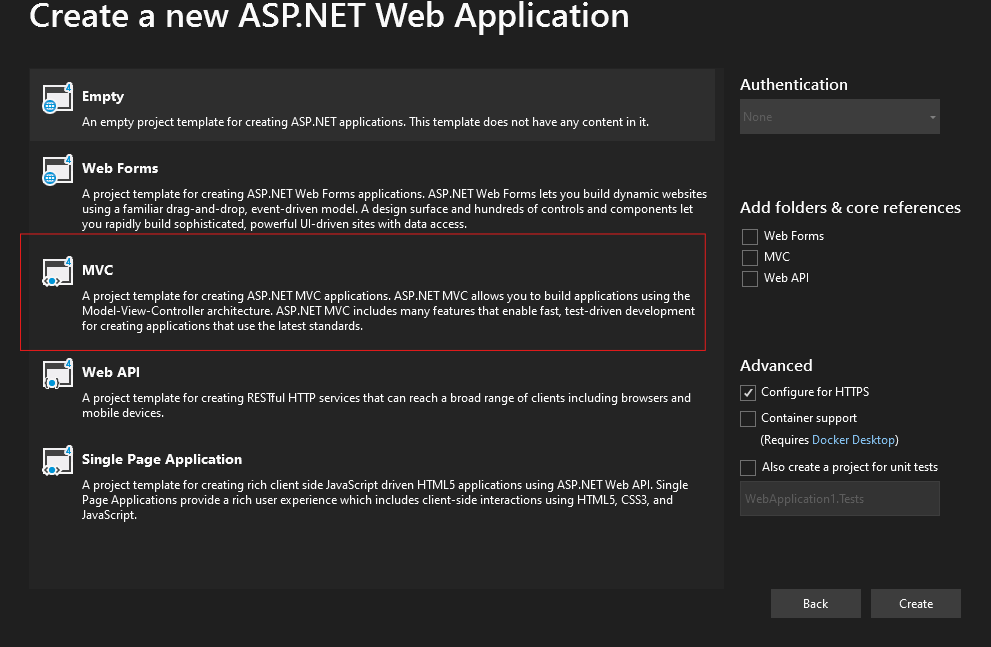
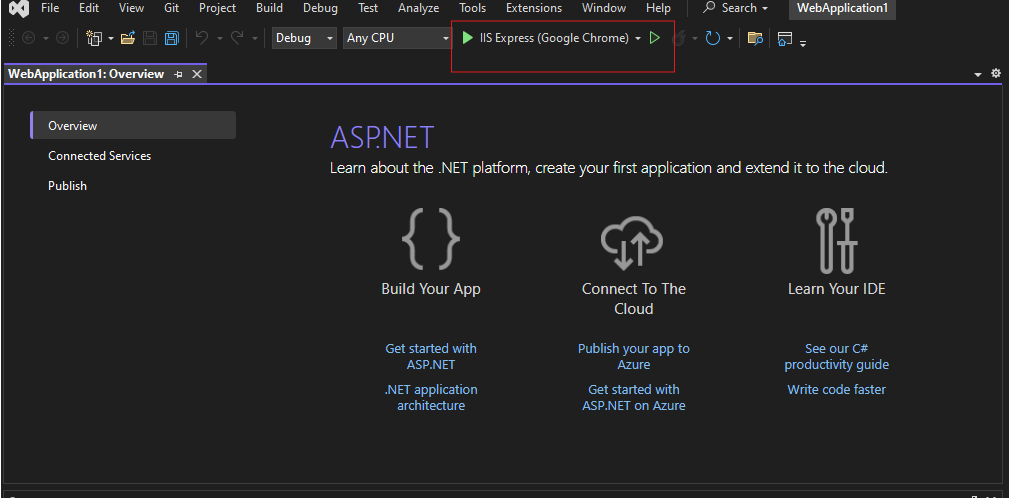
Now you application will be available in respective folder and you can upload this to your Azure repo.
Create different type of project
- Click here to create maven or other type of Project
Push the Sample Application to Repo (Maven)
- DevOps Portal → Create a Project (HelloWorldApp)
- Project → Repo → Files → Copy Clone URL to Clipboard
- In your terminal, run the following commands:
git clone <Paste the URL> - Navigate to the directory:
cd HelloWorldApp - Initialize the Maven project (if not already done):
mvn archetype:generate -DgroupId=com.example -DartifactId=HelloWorldApp -DarchetypeArtifactId=maven-archetype-quickstart -DinteractiveMode=false - Compile the project:
mvn compile - Run the tests:
mvn test - Package the project:
mvn package - Clean up the target directory (optional):
mvn clean - Stage the changes:
git add . - Commit the changes:
git commit -m "Initial Commit" - Push the changes to the repository:
git push origin master - Switch back to the web portal and view the committed files.
maven Repo https://github.com/nippyk9/t1-student-maven-proj
What is Azure Pipelines?
Azure Pipelines is the part of Azure DevOps that automatically builds, tests, and deploys code projects. Azure Pipelines combines continuous integration, continuous testing, and continuous delivery to build, test, and deliver your code to any destination. Azure Pipelines supports all major languages and project types.
Azure Pipelines Benefits
Azure Pipelines provides a quick, easy, and safe way to automate building your projects with consistent and high-quality code that’s readily available to users. It offers a wide range of features to streamline continuous integration (CI) and continuous delivery (CD) pipelines.
Key Benefits of Azure Pipelines
-
Supports Any Language or Platform:
- You can build, test, and deploy applications written in any language, such as Python, Java, JavaScript, C#, Ruby, PHP, and more.
-
Deploy to Multiple Targets Simultaneously:
- Azure Pipelines allows you to deploy to various targets, including virtual machines, containers, serverless functions, on-premises environments, and multiple cloud providers at the same time.
-
Azure Integration:
- It integrates deeply with Azure, making it easy to deploy applications and services to Azure App Service, Azure Kubernetes Service (AKS), Azure Functions, and more.
-
Cross-Platform Support:
- You can build your project on Windows, Linux, or macOS build agents, ensuring compatibility and flexibility for various platforms.
-
GitHub Integration:
- Seamlessly integrates with GitHub, enabling automated builds, testing, and deployments when changes are pushed to your GitHub repositories.
-
Supports Open-Source Projects:
- Azure Pipelines provides free access to open-source projects, with unlimited build minutes for public repositories.
Additional Advantages:
- Parallel Jobs: Run multiple jobs in parallel, speeding up the build and deployment process.
- Customizable Workflows: Easily configure CI/CD workflows using YAML or visual editors.
- Cloud and Self-Hosted Agents: Use Microsoft-hosted agents or self-hosted agents for more control over the build environment.
- Extensive Marketplace: Access a wide range of pre-built tasks and extensions from the Azure DevOps Marketplace to integrate with third-party services.
For more information, visit the Azure Pipelines Documentation.
Continuous integration
- Continuous integration (CI) is a practice development teams use to automate merging and testing code.
- CI helps to catch bugs early in the development cycle, making them less expensive to fix.
Continuous delivery
- Continuous delivery (CD) is the process of building, testing, and deploying code to one or more test or production environments.
- Deploying and testing in multiple environments optimizes quality.
Continuous Deployment
- Continuous Deployment takes continuous delivery a step further by automating the entire release process, including deploying to production.
- There’s no human intervention once code passes the tests. Every code change that passes the testing phase is automatically deployed to the production environment.
Deployment targets
Use Azure Pipelines to deploy your code to multiple targets. Targets include virtual machines, environments, containers, on-premises and cloud platforms, and platform-as-a-service (PaaS) services. You can also publish your mobile application to a store.
Once you have CI in place, you can create a release definition to automate the deployment of your application to one or more environments. The automation process is defined as a collection of tasks.
Key Differences in Azure DevOps Continuous Deployment & Continuous Delivery
| Feature | Continuous Delivery (CD) | Continuous Deployment (CD) |
|---|---|---|
| Manual Approval in Prod | Required before production deployment | No manual intervention required |
| Automated Deployments | Deployments to non-production environments are automated; production needs approval | All deployments, including production, are automated |
| Stages in Azure Pipelines | Staging environments may be automated; production requires an approval gate | All environments, including production, are automatically deployed |
| Rollback Options | Manual rollback possible if production deployment fails | Automated rollback based on tests or manual rollback tools if configured |
Pipelines Basics
- A trigger tells a pipeline to run.
- A pipeline is made up of one or more stages. A pipeline can deploy to one or more environments.
- A stage is a way of organizing jobs in a pipeline and each stage can have one or more jobs.
- Each job runs on one agent. A job can also be agentless.
- Each agent runs a job that contains one or more steps.
- A step can be a task or script and is the smallest building block of a pipeline.
- A task is a prepackaged script that performs an action, such as invoking a REST API or publishing a build artifact.
- An artifact is a collection of files or packages published by a run.
Agent
When your build or deployment runs, the system begins one or more jobs. An agent is computing infrastructure with installed agent software that runs one job at a time. For example, your job could run on a Microsoft-hosted Ubuntu agent. Know more about microsoft hosted Agents
Approvals
Approvals define a set of validations required before a deployment runs. Manual approval is a common check performed to control deployments to production environments. When checks are configured on an environment, a pipeline run pauses until all the checks are completed successfully.
Artifact
An artifact is a collection of files or packages published by a run. Artifacts are made available to subsequent tasks, such as distribution or deployment. For more information, see Artifacts in Azure Pipelines.
Deployment
-
A classic pipeline deployment is the action of running the tasks for one stage. The deployment can include running automated tests, deploying build artifacts, and any other actions are specified for that stage.
-
For YAML pipelines, a deployment refers to a deployment job. A deployment job is a collection of steps that are run sequentially against an environment. You can use strategies like run once, rolling, and canary for deployment jobs.
Deployment group
A deployment group is a set of deployment target machines that have agents installed. A deployment group is just another grouping of agents, like an agent pool. You can set the deployment targets in a pipeline for a job using a deployment group.
Environment
An environment is a collection of resources where you deploy your application. One environment can contain one or more virtual machines, containers, web apps, or any service. Pipelines deploy to one or more environments after a build is completed and tests are run.
Release
- For classic pipelines, a release is a versioned set of artifacts specified in a pipeline.
- The release includes a snapshot of all the information required to carry out all the tasks and actions in the release pipeline, such as stages, tasks, policies such as triggers and approvers, and deployment options.
- You can create a release manually, with a deployment trigger, or with the REST API.
Script
- A script runs code as a step in your pipeline using command line, PowerShell, or Bash.
- You can write cross-platform scripts for macOS, Linux, and Windows. Unlike a task, a script is custom code that is specific to your pipeline.
Stage
A stage is a logical boundary in the pipeline. It can be used to mark separation of concerns (for example, Build, QA, and production). Each stage contains one or more jobs. When you define multiple stages in a pipeline, by default, they run one after the other. You can specify the conditions for when a stage runs.
Job
A stage contains one or more jobs. Each job runs on an agent. A job represents an execution boundary of a set of steps. All of the steps run together on the same agent. Jobs are most useful when you want to run a series of steps in different environments. For example, you might want to build two configurations - x86 and x64. In this case, you have one stage and two jobs. One job would be for x86 and the other job would be for x64.
Step
A step is the smallest building block of a pipeline. For example, a pipeline might consist of build and test steps. A step can either be a script or a task. A task is simply a precreated script offered as a convenience to you.
Task
A task is the building block for defining automation in a pipeline. A task is packaged script or procedure that has been abstracted with a set of inputs.
Trigger
A trigger is something that’s set up to tell the pipeline when to run. You can configure a pipeline to run upon a push to a repository, at scheduled times, or upon the completion of another build. All of these actions are known as triggers.
Library
The Library includes secure files and variable groups. Secure files are a way to store files and share them across pipelines. For example, you may want to reference the same file for different pipelines. In that case, you can save the file within Library and use it when you need it. Variable groups store values and secrets that you might want to be passed into a YAML pipeline or make available across multiple pipelines
Azure Pipelines Feature Comparison
| Description | YAML | Classic Pipeline | Classic Release | |
|---|---|---|---|---|
| Agents | A software component that runs tasks defined in your Azure Pipelines on a machine. | ✔ | ✔ | ✔ |
| Approvals | Require designated approvers before deploying to a stage. | ✔ | ✔ | |
| Artifacts | Download and publish your binaries/packages to various destinations. | ✔ | ✔ | ✔ |
| Caching | Reduce build time by caching dependencies from previous runs. | ✔ | ✔ | |
| Conditions | Specify conditions under which a step, job, or stage runs. | ✔ | ✔ | ✔ |
| Container jobs | Specify jobs to run in a container. | ✔ | ||
| Demands | Ensure the capabilities needed by the pipeline are present on the running agent. | ✔ | ✔ | ✔ |
| Dependencies | Specify a requirement to be met to run the next stage. | ✔ | ✔ | |
| Deployment groups & Environments | Deployment groups (Classic) define target machines. Environments (YAML) are collections of resources for deployment. | ✔ | ✔ | |
| Deployment jobs | A collection of deployment steps executed sequentially against an environment. | ✔ | ||
| Gates | Automate release controls by evaluating health signals from external services. | ✔ | ||
| Jobs | A series of sequential steps that form the smallest unit of work. | ✔ | ✔ | ✔ |
| Library | Collection of assets such as Variable groups and Secure files. | ✔ | ✔ | ✔ |
| Service connections | Enable connection to an external service required to execute tasks in a job. | ✔ | ✔ | ✔ |
| Service containers | Manage the lifecycle of a containerized service, often used with container jobs. | ✔ | ||
| Stages | Organize jobs within a pipeline. | ✔ | ✔ | |
| Task groups | Encapsulate a sequence of tasks into a single reusable task. | ✔ | ✔ | |
| Tasks | The building blocks that define the steps in a pipeline job. | ✔ | ✔ | ✔ |
| Templates | Define reusable content, logic, and parameters. | ✔ | ||
| Triggers | Define the event that causes a pipeline to run. | ✔ | ✔ | ✔ |
| Variables | Placeholders for values used throughout pipeline execution. | ✔ | ✔ | ✔ |
| Variable groups | Store values and secrets to manage and share across multiple pipelines. | ✔ | ✔ | ✔ |
Classical Pipeline in Azure DevOps
A Classical Pipeline in Azure DevOps is a graphical user interface (GUI) pipeline where you define the steps to build, test, and deploy your application.
- Below is a step-by-step guide to creating your first classical pipeline.
Prerequisites
Before you begin, make sure:
- You have an Azure DevOps account.
- You have a project and a repository set up in Azure DevOps.
- You have some source code in the repository that you want to build.
Steps to Create a Classical Pipeline
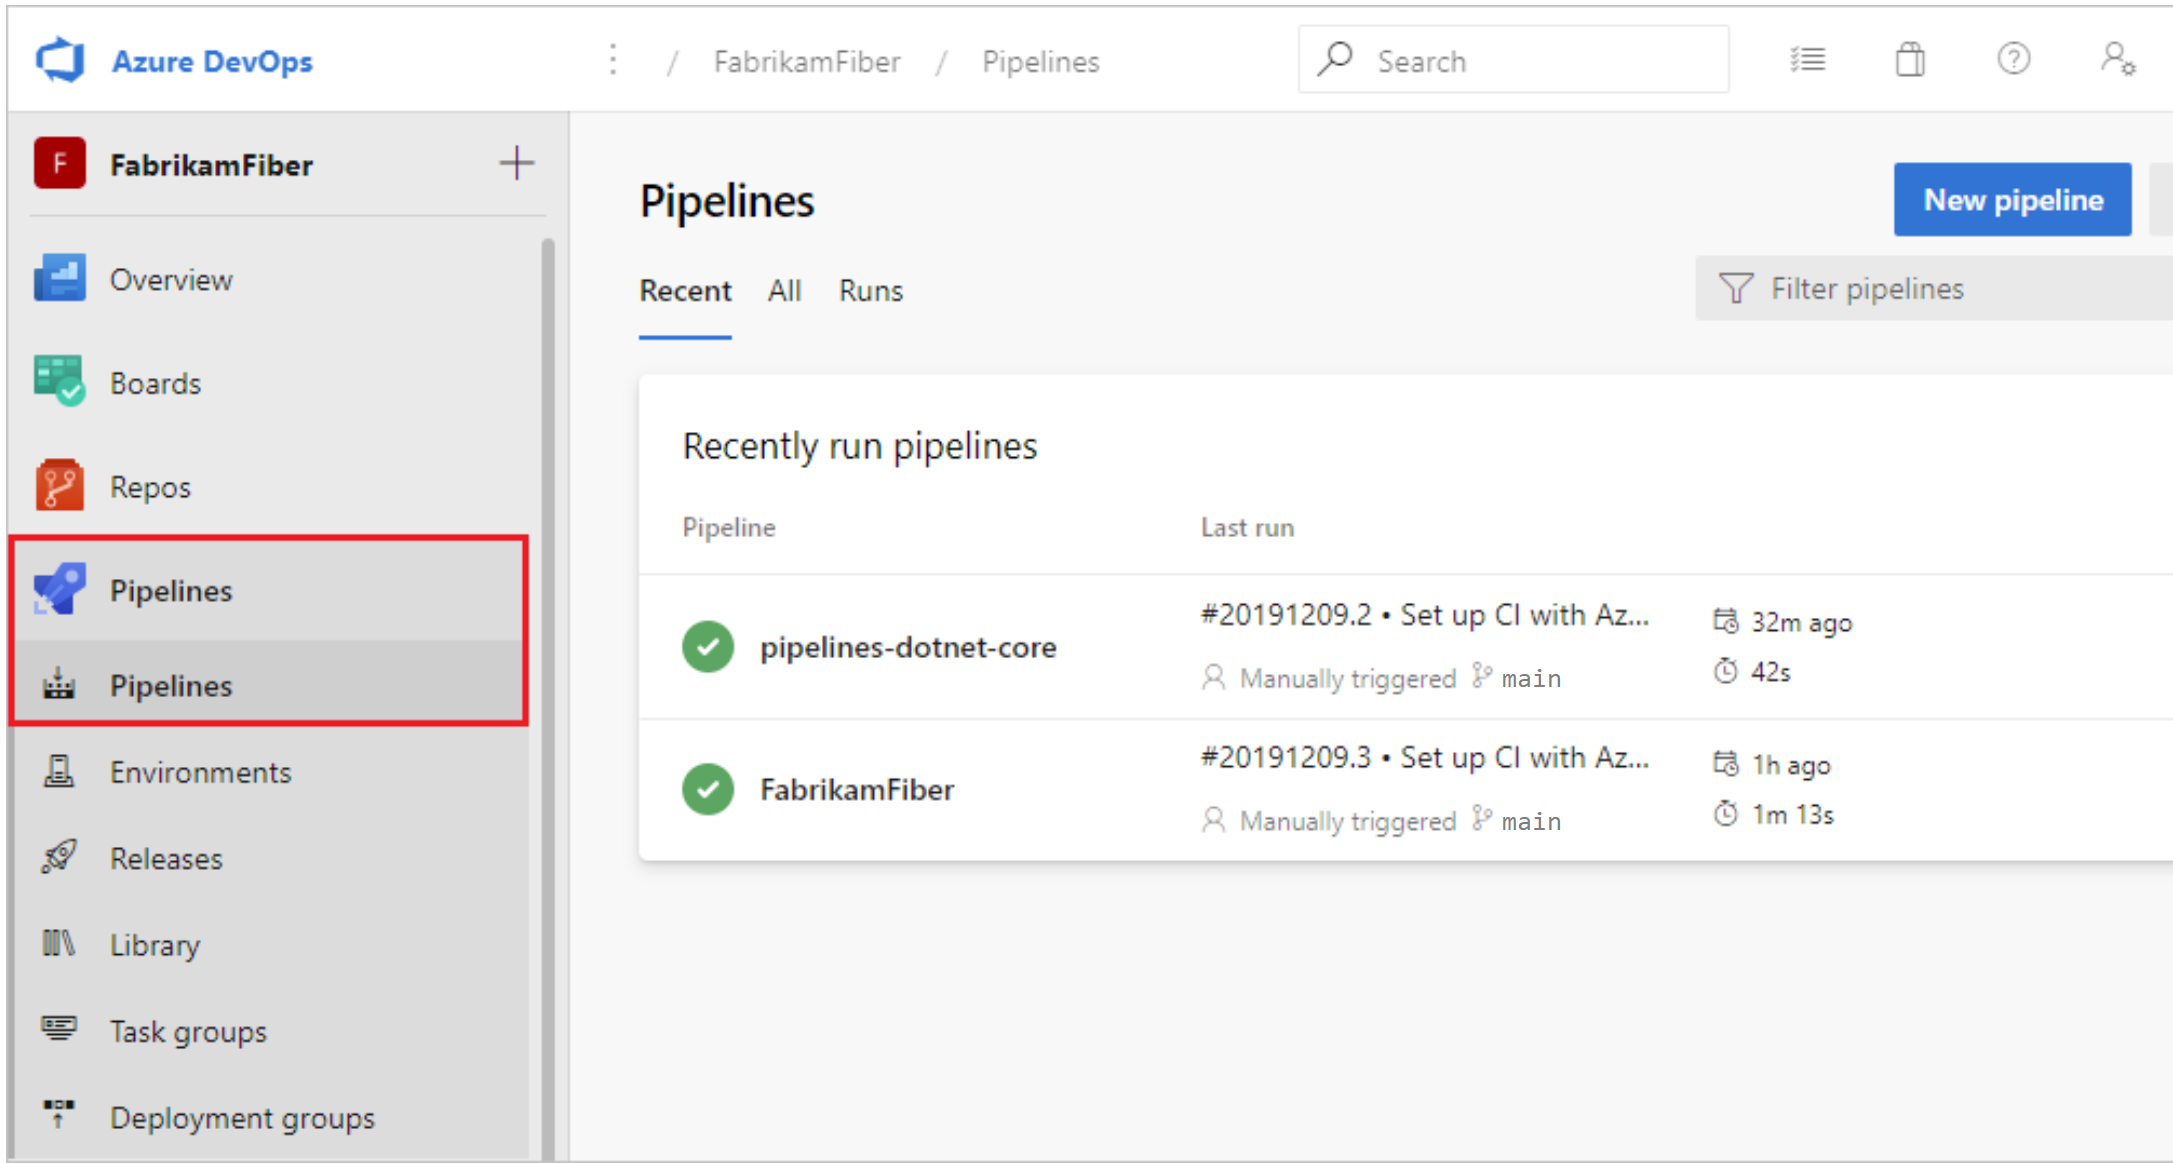
1. Navigate to Pipelines
- Go to your Azure DevOps project.
- In the left sidebar, select Pipelines.
- Click on Pipelines under the dropdown to view all existing pipelines.
2. Create a New Pipeline
- Click on the New Pipeline button.
- You’ll be prompted to select where your code is stored:
- Azure Repos Git: For repositories within Azure DevOps.
- GitHub: For repositories stored on GitHub.
- Other Git: For other Git repositories.
- Choose the appropriate option, and authorize if needed.
3. Select the Pipeline Type
- Azure DevOps will ask if you want to use YAML or the Classical Editor.
- Choose Use the Classic Editor at the bottom of the screen.
4. Configure the Pipeline
- Select a repository: Choose the repository you want to use for the pipeline.
- Select a template: Choose a pipeline template based on your project type. For example, select:
- ASP.NET for .NET applications.
- If you don’t see a suitable template, you can start with an empty job.
5. Define Pipeline Stages
A classical pipeline consists of different stages like build, test, and deploy.
-
Add a Build Stage:
- Click on the Agent job 1 to configure the build step.
- Click on the + icon to add tasks. Common tasks include:
- Restore NuGet packages (for .NET projects).
- Run build commands (e.g.,
MSBuild,npm, etc.).
- Set any relevant parameters for each task.
-
Add Test Stage (Optional):
- Add test tasks (e.g., Run Unit Tests).
- Define the testing framework you are using.
-
Add Deploy Stage (Optional):
- Add tasks to deploy the application to environments like Azure App Service, Kubernetes, or VMs.
6. Save and Queue the Pipeline
- Once you’ve defined the tasks, click Save & Queue.
- Set the pipeline variables if needed and click Save.
- The pipeline will now start running, performing the steps you’ve defined (e.g., build, test, and deploy).
7. Monitor Pipeline Execution
- You will be redirected to the Pipelines page, where you can see the execution status of your pipeline.
- You can view detailed logs for each step by clicking on the specific stages or tasks.
Create Some Basics Pipeline as well to understand the functionality and all options
Pipeline 1
- Create one service connection for Linux Vm
- Copy some file using pipeline or run some command over there.

Create Your Classical Pipeline for Maven in Azure DevOps
This guide will walk you through setting up a classical pipeline for a Maven project in Azure DevOps.
Steps to Create a Classical Pipeline for Maven
1. Navigate to Pipelines
- Go to your Azure DevOps project.
- Select Pipelines from the left-hand sidebar.
- Click Pipelines to see all existing pipelines.
2. Create a New Pipeline
- Click New Pipeline.
- Choose the location of your source code (e.g., Azure Repos Git, GitHub, etc.).
- Authorize the repository if required.
3. Use the Classical Editor
- After selecting your repository, choose Use the Classic Editor at the bottom of the page.
4. Select a Maven Template
- Choose the repository that contains your Maven project.
- Select the Maven pipeline template. If the template is not available, choose Empty job and manually add the Maven tasks.
5. Configure the Build Pipeline
-
Agent Job:
- Click Agent job 1 to configure the agent. Select an agent pool that supports Java and Maven (e.g., a Linux or Windows agent).
-
Add Maven Task:
- Click the + icon on the Agent job to add a new task.
- Search for Maven and add the Maven task.
- Configure the Maven POM file (usually
pom.xml) and specify the goals (e.g.,clean install) to build and test the project.
-
Publish Test Results (Optional):
- Add the Publish Test Results task to capture the results of unit tests.
- Set the test results format to JUnit and point to the test report directory (
**/target/surefire-reports/*.xml).
-
Publish Artifacts (Optional):
- Add the Publish Build Artifacts task to store build outputs (e.g., JAR files) for deployment or download.
- Specify the directory containing the built artifacts (
targetfor Maven).
6. Save and Run the Pipeline
- Once all tasks are configured, click Save & Queue.
- You can modify pipeline variables or use the default settings and then click Run.
7. Monitor Pipeline Execution
- Azure DevOps will start running the pipeline, executing the steps to build your Maven project.
- View the logs for each stage, and review the build and test results.
Summary
This classical pipeline builds, tests, and optionally publishes artifacts for a Maven project in Azure DevOps. You can extend this pipeline by adding additional stages or tasks such as deployment.
How to Create a Service Connection in Azure DevOps
What is a Service Connection?
A Service Connection in Azure DevOps is a secure link between Azure DevOps and external services (e.g., Azure, AWS, Docker, GitHub, Kubernetes). It allows pipelines and other features in Azure DevOps to interact with these services securely, without needing to expose sensitive credentials directly in pipeline code.
Benefits:
- Secure Authentication: Manage credentials safely.
- Seamless Integration: Enable Azure DevOps to communicate with external systems for builds, deployments, and other automated processes.
Steps to Create a Service Connection
1. Navigate to the Project Settings
- Go to your Azure DevOps project.
- In the bottom left corner, click on Project Settings.
2. Access the Service Connections Section
- In the left-hand sidebar under the Pipelines category, click on Service Connections.
3. Create a New Service Connection
-
Click the New Service Connection button at the top-right.
-
A list of connection types will appear. You can choose from:
- Azure Resource Manager (for Azure cloud services)
- AWS (for Amazon Web Services)
- Docker Registry (for Docker image management)
- GitHub (for integration with GitHub repositories)
- Kubernetes (for managing Kubernetes clusters)
- Others depending on your needs.
-
Select the type of service connection you want to create (e.g., Azure Resource Manager for Azure).
4. Provide Connection Details
-
Based on the type of service connection selected, provide the necessary credentials:
- For Azure Resource Manager, you may need to authorize access using your Azure subscription or provide a service principal.
- For AWS, provide access keys or assume a role for authentication.
- For Docker Registry, provide the Docker registry URL, username, and password.
-
Fill in the required fields, such as Subscription, Service Principal, or any other credentials related to the service you’re connecting to.
5. Grant Access Permissions
-
You can configure whether this service connection should be accessible by all pipelines or restricted to specific pipelines or users.
-
If needed, select the checkbox for Grant access permission to all pipelines.
6. Verify and Finish
-
Once you’ve filled in all the details, click Verify to test the connection.
-
If the connection is successful, click Save.
Using the Service Connection in a Pipeline
After creating the service connection, it can be referenced in your pipeline YAML or classical pipelines as needed. For example, in a YAML pipeline:
pool:
  vmImage: 'ubuntu-latest'

steps:
- task: AzureCLI@2
  inputs:
    azureSubscription: '<your-service-connection-name>'
    scriptType: 'bash'
    scriptLocation: 'inlineScript'
    inlineScript: 'az --version'
Classical Pipeline Variables in Azure DevOps
What are Pipeline Variables?
In Azure DevOps, pipeline variables allow you to store and reuse values within your pipeline, such as file paths, environment names, or sensitive data like passwords. Variables help you make your pipeline more dynamic and configurable by defining them once and using them across multiple stages, jobs, or tasks.
Types of Variables
1. System-defined Variables
These are built-in variables provided by Azure DevOps that contain information about the environment, pipeline, or agent. Examples include:
Build.SourceBranch: The name of the branch the build is running on.Build.BuildId: The unique ID of the build.Agent.OS: The operating system of the agent.
2. User-defined Variables
You can define custom variables in your classical pipeline to hold specific values. These are used to customize pipeline behavior and store non-sensitive information, such as environment names or paths.
3. Secret Variables
These are user-defined variables that contain sensitive information like passwords, API keys, or connection strings. They are masked in logs to prevent accidental exposure.
Defining Variables in Classical Pipelines
In a classical pipeline, variables can be defined at the pipeline, stage, or job level. Here’s how you can define and use them:
1. Defining Pipeline Variables
- Go to the Pipelines section in Azure DevOps.
- Select the pipeline you want to edit.
- In the pipeline editor, click on the Variables tab.
- Click Add to create a new variable.
- Enter a name for the variable.
- Enter a value (for sensitive information, check the box for Keep this value secret).
- Click OK to save the variable.
2. Using Variables in Pipeline Tasks
Once defined, you can use the variable in any task by referencing it with the $(variableName) syntax.
Example:
steps:
- task: Maven@3
  inputs:
    mavenPomFile: '$(Build.SourcesDirectory)/pom.xml'
    options: '-DskipTests'
    goals: 'package'
What Are Pipeline others Options?
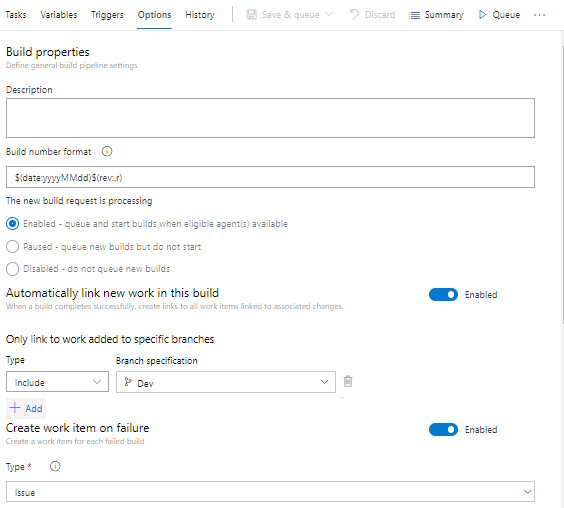
Pipeline options in Azure DevOps provide additional configuration for the behavior of your pipeline. These options allow you to control how the pipeline runs, handles failures, logs information, and integrates with external systems. In classical pipelines (also known as designer-based pipelines), these settings are configurable through the Azure DevOps UI.
Key Pipeline Options
Agent Specification
The agent specification allows you to define the type of machine (agent) on which the pipeline tasks will run. You can specify an agent pool that consists of self-hosted or Microsoft-hosted agents, depending on your requirements.
- Example Agent Pools:
- Hosted Ubuntu 2022
- Hosted Windows 2022
- Hosted macOS 13
Timeout
The timeout setting defines how long a pipeline can run before it is automatically canceled. You can set the duration in minutes for individual jobs or stages.
- Default Value: 60 minutes
- Example: Set the timeout to 30 minutes for a long-running job.
Retain Runs
The “Retain Runs” option allows you to keep specific pipeline runs indefinitely, preventing them from being automatically deleted by the retention policy. This is useful for keeping runs related to important releases or key milestones.
- Use Case: Retain builds for an official release.
Build Number Format
The build number format defines the naming convention for the build number in your pipeline. You can use predefined variables to generate dynamic build numbers.
- Example:
$(Build.DefinitionName)_$(Year:yyyy).$(Month).$(DayOfMonth)$(Rev:.r) - This would produce a build number like:
MyPipeline_2024.10.21.r1.
Clean Option
The clean option allows you to control whether the workspace (the working directory where builds happen) is cleaned between each run. This ensures that each build starts with a fresh environment, avoiding issues caused by residual files from previous runs.
- Options:
- True: Cleans the workspace before starting the pipeline.
- False: Retains the workspace between builds for faster runs.
Parallel Jobs
If your project or build requires parallel execution, Azure DevOps allows you to configure parallel jobs. This option helps optimize build times by running multiple tasks concurrently, given that the agent pool has enough capacity.
- Use Case: Running multiple test suites or parallel stages to reduce overall build time.
Multi-Stage Pipelines
Classical pipelines allow you to create multi-stage pipelines, where each stage can have its own set of tasks, jobs, and agent specifications. Stages can be used to define distinct steps in your CI/CD process, such as building, testing, and deploying code.
- Example Stages:
- Build Stage: Compiles the code.
- Test Stage: Runs unit tests.
- Deploy Stage: Deploys the code to an environment.
Failing Conditions
You can specify conditions under which a pipeline, stage, or job will fail. This allows you to set custom criteria for failure and ensure that certain conditions are met for a successful build.
- Options:
- Fail on Specific Exit Codes: You can fail a task based on specific error codes.
- Fail on Warnings: Mark a pipeline as failed if there are any warnings during execution.
Continue on Error
This option allows a job or step to continue running even if a previous step has failed. It is useful when you want to allow the pipeline to complete, even if certain non-critical tasks fail.
- Example: A test step may fail, but you still want the deployment to proceed.
Trigger Options
Continuous Integration (CI) Trigger
This option defines whether the pipeline should automatically trigger when new changes are pushed to the repository.
- Example: Enable CI to trigger the pipeline every time code is pushed to the
mainbranch.
Scheduled Trigger
This allows you to schedule pipeline runs at specific times, independent of when code is committed to the repository.
- Example: Schedule a nightly build every day at midnight.
Pull Request Trigger
You can configure the pipeline to trigger automatically when a pull request is created or updated. This ensures that the pipeline runs for every change in a pull request, helping detect issues early.
- Use Case: Automatically build and test changes as soon as they are submitted in a pull request.
Branch Control
You can configure your pipeline to only run for specific branches or to exclude certain branches from triggering builds.
- Example: Run the pipeline only for the
mainanddevelopbranches.
Artifact Publishing Options
You can configure how artifacts (e.g., build outputs) are published and stored. This is important for making the results of your builds available for deployment or further processing.
- Example: Publish artifacts to Azure Artifacts, a file share, or a Docker registry.
Retry Policies
Azure DevOps allows you to configure retry policies for individual pipeline tasks. This is useful if a task fails due to transient issues like network errors.
- Example: Retry a failed step up to 3 times.
Customizing Pipeline Options
You can customize pipeline options either in the classical editor or in the pipeline YAML file. In the classical editor:
- Navigate to Pipelines in your Azure DevOps project.
- Select the pipeline you want to edit.
- Go to the Options tab where you can configure settings like build number format, timeout, and triggers.
Summary
Pipeline options in Azure DevOps allow you to control various aspects of how your pipeline behaves, from agent specification and timeouts to triggers and artifact publishing. These options provide flexibility and help ensure that your pipeline runs smoothly and efficiently.
Create an issue on Build failure
Classical Release Pipelines in Azure DevOps
What is a Release Pipeline?
A release pipeline in Azure DevOps is a set of automated processes that deploy applications to different environments (e.g., development, testing, production). It helps ensure that code changes are delivered reliably and consistently, allowing teams to manage the deployment of applications effectively.
Key Components of Release Pipelines
Artifacts
- Definition: Artifacts are the output of build pipelines and contain the files that need to be deployed (e.g., binaries, packages, scripts).
- Use Case: Artifacts are pulled into the release pipeline from build pipelines to deploy to target environments.
Environments
- Definition: Environments represent the target locations where the application will be deployed (e.g., staging, production).
- Configuration: You can configure different settings and approvals for each environment to ensure the correct deployment process.
Stages
- Definition: Stages are logical grouping of deployment steps within a release pipeline. Each stage can represent a different environment or phase of deployment (e.g., QA, Production).
- Execution: Stages can run sequentially or in parallel, depending on how you configure your pipeline.
Tasks
- Definition: Tasks are the individual steps that perform actions within a stage (e.g., deploying an application, running scripts).
- Customization: You can add various tasks, including deployment tasks, testing tasks, and custom scripts.
Approvals and Checks
- Definition: Approvals are required before a deployment can proceed to a certain environment. Checks can include manual approvals, automated checks, or gate evaluations.
- Use Case: Ensures that appropriate stakeholders review and authorize deployments to critical environments.
Creating a Classical Release Pipeline
Step Define Your Artifacts
- Ensure you have a build pipeline that produces the necessary artifacts.
- In the release pipeline, link to the artifacts from the build pipeline.
Step Create a New Release Pipeline
- Navigate to Pipelines in Azure DevOps.
- Select Releases and click on New pipeline.
- Choose the Empty job option or select a template if available.
Add Stages
- Click on the Add a stage button.
- Choose an existing stage or create a new one.
- Name the stage appropriately (e.g., QA, Production).
Configure the Stage
- Select the stage and click on Jobs to add a job to the stage.
- Add tasks by clicking on + Add tasks to define the deployment steps for the stage.
- Configure each task with the necessary inputs (e.g., Azure subscription, app service).
Set Up Approvals and Checks
- Click on the Pre-deployment conditions for a stage.
- Enable approvals and define who needs to approve deployments.
- Optionally, add automated checks to ensure quality gates are met before deployment.
Save and Create a Release
- Click Save to save your release pipeline configuration.
- Click on Create release to manually trigger a deployment.
- Select the artifact version and environment to deploy to.
Managing Release Pipelines
Monitoring Releases
- You can view the status of releases, including deployment success, failure, and logs from the Releases section.
- Each release instance provides detailed logs for each task, allowing you to troubleshoot issues.
Approvals Management
- Approvals can be managed in the pipeline settings, allowing you to edit who can approve releases and define approval workflows.
Rollback Strategies
- It’s essential to define rollback strategies in case of failed deployments. Azure DevOps allows you to redeploy previous successful releases easily.
Variable Groups
- Use variable groups to manage and store common variables across multiple release pipelines. This helps with managing configuration settings such as connection strings and API keys.
Best Practices
- Use Stages Wisely: Organize your stages based on environments and deployment processes to streamline releases.
- Automate Approvals: Where possible, automate approvals and checks to speed up the release process while maintaining quality.
- Monitor and Log: Continuously monitor release logs and metrics to identify trends and areas for improvement in your deployment process.
- Implement CI/CD: Integrate continuous integration (CI) practices with your release pipeline for automated testing and validation before deployment.
Summary
Classical release pipelines in Azure DevOps provide a robust framework for managing the deployment of applications across various environments. By utilizing artifacts, environments, stages, and tasks, teams can ensure a reliable and consistent deployment process. Leveraging features like approvals, checks, and variable groups enhances the pipeline’s effectiveness and security.
How to Create a Task Group in Azure DevOps
What is a Task Group?
A task group in Azure DevOps is a collection of tasks that can be reused across multiple pipelines. Task groups allow you to encapsulate a set of related tasks into a single reusable component, simplifying pipeline management and promoting consistency.
Steps to Create a Task Group
Step 1: Navigate to Pipelines
- Sign in to your Azure DevOps organization.
- Go to your project.
- In the left-hand menu, select Pipelines.
Step 2: Access Task Groups
- Click on the Task groups tab (you may find it under the Library section).
- Click on + New to create a new task group.
Step 3: Define the Task Group
-
Name the Task Group:
- Enter a meaningful name for your task group.
- Optionally, provide a description to help others understand its purpose.
-
Add Tasks:
- Click on + Add tasks to add tasks to your task group.
- Select the tasks you want to include from the available tasks list.
- You can search for specific tasks or filter by categories.
-
Configure Task Parameters:
- For each task added, configure the parameters as needed.
- You can set default values that can be overridden when the task group is used in a pipeline.
Step 4: Set Up Variables (Optional)
- You can define variables specific to the task group that can be used within the tasks.
- Click on + Add variable to create a new variable, providing a name and value.
Step 5: Save the Task Group
- After adding and configuring all tasks, click Save.
- Your task group will now be available for use in any pipeline.
Using the Task Group in a Pipeline
Step 1: Edit a Pipeline
- Navigate to the Pipelines section.
- Select the pipeline where you want to use the task group and click Edit.
Step 2: Add the Task Group
- In the pipeline editor, click on + to add a new task.
- Search for your task group by its name.
- Select the task group from the list to add it to the pipeline.
Step 3: Configure Task Group Parameters
- Configure any parameters defined in the task group as needed.
- Override any default values if necessary.
Step 4: Save and Run the Pipeline
- Save your pipeline changes and run the pipeline to execute the tasks defined in the task group.
Managing Task Groups
Editing a Task Group
- To edit a task group, go back to the Task groups tab.
- Select the task group you want to modify and click Edit.
- Make your changes and save.
Deleting a Task Group
- To delete a task group, navigate to the Task groups tab.
- Select the task group and click on Delete.
Viewing Task Group Usage
- You can view where a task group is used across pipelines by checking its details in the Task groups tab.
How to Create a Variable Group in Azure DevOps
What is a Variable Group?
A variable group in Azure DevOps is a way to manage variables that can be shared across multiple pipelines. It allows you to centralize variable management, making it easier to update and maintain configurations used in your builds and releases.
Steps to Create a Variable Group
Step 1: Navigate to Pipelines
- Sign in to your Azure DevOps organization.
- Go to your project.
- In the left-hand menu, select Pipelines.
Step 2: Access Library
- In the Pipelines section, click on Library in the left-hand menu.
- You will see the Variable groups tab.
Step 3: Create a New Variable Group
- Click on + Variable group to create a new variable group.
Step 4: Define the Variable Group
-
Name the Variable Group:
- Enter a meaningful name for your variable group (e.g.,
BuildVariables,ProductionSettings). - Optionally, provide a description to help others understand its purpose.
- Enter a meaningful name for your variable group (e.g.,
-
Add Variables:
- Click on + Add to add a variable.
- Enter the variable name and value.
- You can choose to mark the variable as secret if it contains sensitive information (e.g., passwords, API keys).
-
Continue Adding Variables:
- Repeat the process to add any additional variables you need.
Step 5: Save the Variable Group
- After adding all desired variables, click Save to create the variable group.
Using Variable Groups in a Pipeline
Step 1: Edit a Pipeline
- Navigate to the Pipelines section.
- Select the pipeline where you want to use the variable group and click Edit.
Step 2: Link the Variable Group
- In the pipeline editor, locate the Variables tab (usually found at the top).
- Click on Link variable group.
- Select the variable group you created and click Link.
Step 3: Access Variables in Tasks
- You can now access the variables from the linked variable group in your pipeline tasks. Use the syntax
$(VariableName)to reference a variable.
Step 4: Save and Run the Pipeline
- Save your pipeline changes and run the pipeline. The tasks will use the variables from the linked variable group.
Managing Variable Groups
Editing a Variable Group
- To edit a variable group, navigate to the Library section.
- Select the variable group you want to modify and click Edit.
- Make your changes and save.
Deleting a Variable Group
- To delete a variable group, go to the Library section.
- Select the variable group and click on Delete.
Viewing Variable Group Usage
- You can view which pipelines are using a variable group by checking its details in the Library section.
Best Practices
- Use Descriptive Names: Name your variable groups and variables clearly to indicate their purpose.
- Limit Scope: Only include variables in a group that are relevant to specific pipelines to avoid clutter.
- Manage Secrets Carefully: Use secret variables for sensitive information and manage access to those variables.
- Version Control: Consider versioning your variable groups if significant changes are made frequently.
Summary
Creating a variable group in Azure DevOps allows you to manage and reuse variables across multiple pipelines efficiently. By following the steps outlined above, you can create, link, and utilize variable groups in your Azure DevOps projects, simplifying configuration management and promoting consistency.
Integrating Azure Key Vault with Azure DevOps
What is Azure Key Vault?
Azure Key Vault is a cloud service that provides a secure store for secrets, keys, and certificates. It helps safeguard cryptographic keys and secrets used by cloud applications and services.
Benefits of Integration
Integrating Azure Key Vault with Azure DevOps allows you to:
- Store sensitive information securely.
- Access secrets and keys directly in your pipelines.
- Manage permissions and access control for secrets centrally.
Steps to Integrate Azure Key Vault with Azure DevOps
Step 1: Create an Azure Key Vault
- Sign in to Azure Portal: Go to the Azure Portal.
- Create a Key Vault:
- Navigate to Create a resource.
- Search for Key Vault and select Create.
- Fill in the required fields (Subscription, Resource group, Key Vault name, Region).
- Click Review + Create and then Create.
Step 2: Add Secrets to the Key Vault
- Navigate to Your Key Vault: In the Azure Portal, go to your Key Vault.
- Add a Secret:
- Click on Secrets in the left-hand menu.
- Click on + Generate/Import.
- Provide a name and value for your secret, then click Create.
Step 3: Set Up Access Policies
- In your Key Vault, go to Access policies.
- Click on + Add Access Policy.
- Configure Permissions:
- Select the Secret Management permissions you want to grant (e.g., Get, List).
- Under Select principal, search for the Azure DevOps service principal (or your Azure DevOps organization).
- Click Add to grant permissions, then click Save.
Step 4: Enable Azure DevOps Integration
-
Navigate to Azure DevOps: Go to your Azure DevOps organization.
-
Open Project Settings: Select your project and click on Project settings in the lower-left corner.
-
Select Service Connections:
- Under Pipelines, click on Service connections.
- Click + New service connection.
- Select Azure Resource Manager and click Next.
-
Configure the Service Connection:
- Choose Service principal (automatic).
- Select your Azure subscription and the resource group where your Key Vault is located.
- Check the box to grant access to all pipelines, then click Save.
Step 5: Use Key Vault Secrets in Pipelines
-
Edit Your Pipeline: Navigate to the pipeline where you want to use the Key Vault secrets.
-
Add Key Vault Task:
- In the pipeline editor, click on + to add a new task.
- Search for Azure Key Vault and select the Azure Key Vault task.
-
Configure the Key Vault Task:
- Set the Azure subscription to the service connection you created earlier.
- Specify the Key Vault name from which to fetch secrets.
- Optionally, select the secrets you want to retrieve.
-
Reference Secrets in Your Pipeline:
- Use the syntax
$(secretName)to reference the secrets in subsequent tasks.
- Use the syntax
Example YAML Snippet
variables:
- group: your-variable-group
- name: secretFromKeyVault
  value: $(secretName)

jobs:
- job: ExampleJob
  pool:
    vmImage: 'ubuntu-latest'
  steps:
  - task: AzureKeyVault@2
    inputs:
      azureSubscription: 'Your Service Connection'
      KeyVaultName: 'YourKeyVaultName'
      SecretsFilter: '*'
  - script: echo $(secretFromKeyVault)
    displayName: 'Show secret value'
Environments in Azure DevOps
What are Environments?
In Azure DevOps, Environments are a way to define and manage deployment targets where your application can be deployed. They represent specific stages in your deployment pipeline (e.g., Development, Testing, Staging, Production) and can include various resources like Azure resources, Kubernetes clusters, virtual machines, or on-premises servers.
Benefits of Using Environments
- Isolation: Separate environments for development, testing, and production ensure that changes are isolated and can be tested before production deployment.
- Resource Management: Manage and control the deployment resources and configurations for each environment.
- Approval Workflows: Implement approval processes before deploying to critical environments.
- Visibility: Track and visualize the deployment status across different environments.
Creating an Environment in Azure DevOps
Step 1: Navigate to the Pipelines Section
- Sign in to your Azure DevOps organization.
- Go to your project.
- In the left-hand menu, select Pipelines.
Step 2: Access Environments
- Click on Environments in the left-hand menu under Pipelines.
- Click on + New environment to create a new environment.
Step 3: Define the Environment
-
Name the Environment:
- Enter a meaningful name for your environment (e.g.,
Development,Staging,Production).
- Enter a meaningful name for your environment (e.g.,
-
Add Resources:
- You can associate resources such as virtual machines, Kubernetes clusters, or other services with this environment.
- Click on + Add resource to add resources if needed.
Step 4: Configure Approvals and Checks (Optional)
- Click on the Pre-deployment conditions for the environment.
- Enable approvals to require manual intervention before deploying to the environment.
- Optionally, set up automated checks (e.g., integration tests, quality gates) to ensure the environment meets specific criteria before allowing deployment.
Step 5: Save the Environment
- After configuring your environment, click Create to save it.
Using Environments in a Pipeline
Step 1: Edit Your Pipeline
- Navigate to the Pipelines section.
- Select the pipeline where you want to use the environment and click Edit.
Step 2: Add an Environment
- In the pipeline editor, add a deployment job by clicking on +.
- In the job configuration, select the Environment dropdown.
- Choose the environment you created from the list.
Step 3: Configure Deployment Steps
- Add the tasks required for deployment in this environment (e.g., Azure App Service Deploy, Kubernetes Deploy, etc.).
- You can reference environment-specific variables by using the syntax
$(VariableName).
Step 4: Save and Run the Pipeline
- Save your pipeline changes and run the pipeline. The tasks will execute in the context of the specified environment.
Monitoring Environments
Viewing Deployment Status
- In the Environments section, you can see the status of deployments, the history of deployments, and any ongoing deployments.
- Click on an environment to view detailed logs and status for recent deployments.
Accessing Resource Logs
- For resources associated with the environment (like VMs or Kubernetes clusters), you can often access their logs directly from the Azure portal or other monitoring tools integrated with Azure DevOps.
Best Practices
- Use Meaningful Names: Clearly name environments to reflect their purpose (e.g.,
Development,QA,Production). - Implement Approval Workflows: Require approvals for deployments to sensitive environments to enhance security and governance.
- Monitor and Audit Deployments: Regularly review deployment histories and logs to identify issues and improve processes.
- Version Control: Ensure that all deployments to environments are versioned and documented for better traceability.
Summary
Environments in Azure DevOps provide a structured way to manage deployment targets across your application lifecycle. By creating and using environments effectively, you can enhance your deployment process, enforce quality and security measures, and gain better visibility into your deployment activities.
How to Extract YAML from a Classical Pipeline in Azure DevOps
Overview
Azure DevOps allows you to create pipelines using a graphical interface (Classical Pipelines) or YAML. While Classical Pipelines don’t natively provide a YAML view, you can manually convert them into a YAML format for better version control and collaboration.
Steps to Extract YAML from a Classical Pipeline
Step 1: Open Your Classical Pipeline
- Sign in to your Azure DevOps organization.
- Navigate to your project.
- In the left-hand menu, select Pipelines.
- Click on the Classical tab to view your existing Classical Pipelines.
- Select the pipeline you want to extract YAML from and click Edit.
Azure Devops and Sonarqube Integration
https://azuredevopslabs.com/labs/vstsextend/sonarqube/
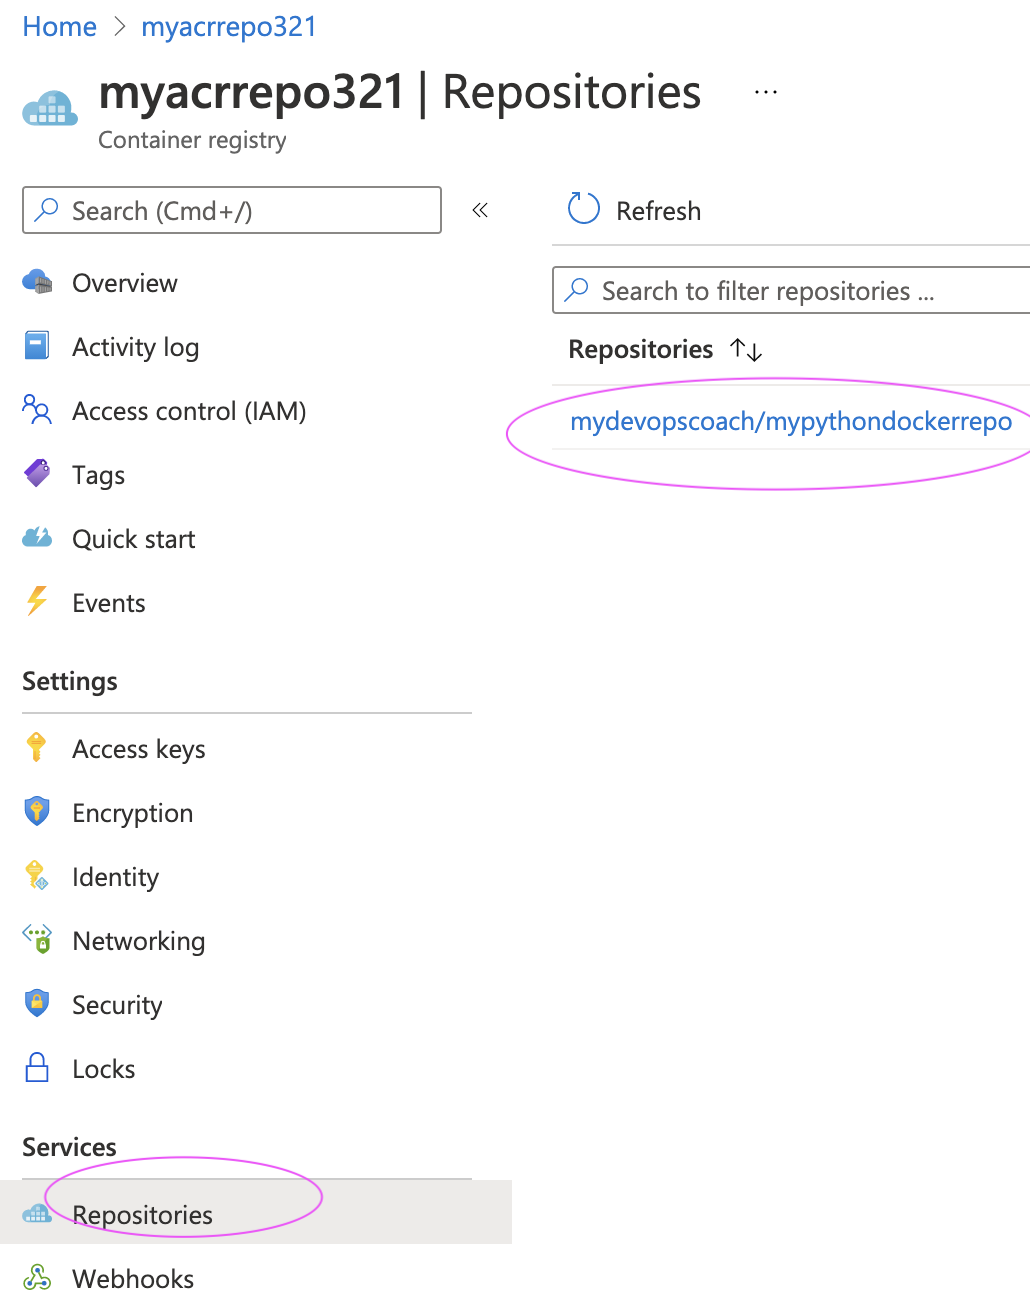
Create Azure Container Registry (ACR)
Prerequisites
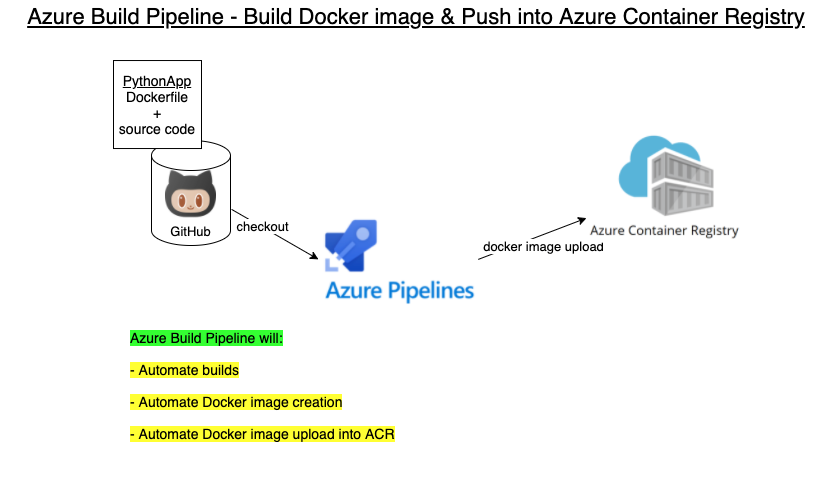
- Azure Container Registry (ACR) is set up in Azure cloud (follow the steps below).
- An Azure DevOps dashboard is already created at Azure DevOps.
- A Dockerfile is created along with the application source code.
Steps to Create Azure Container Registry (ACR)
First, create a resource group. Make sure you are logged in to the Azure portal:
az login
- Execute below command to create a resource group in Azure portal.
az group create --name myResourceGroup --location southcentralus
- Run the below command to create your own private container registry using Azure Container Registry (ACR).
az acr create --resource-group myResourceGroup --name myacrrepo31 --sku Standard --location southcentralus
- Check on Azure portal or using az cli
az acr list -o table
- Login to your newly Created container Registry
az login
az acr login --name myacrrepo310987
- Pull and tag your image
- Push the image to your registry
Create a pipeline using the Github repo or importing to Azure Repo
-
Repo Link Click Here
-
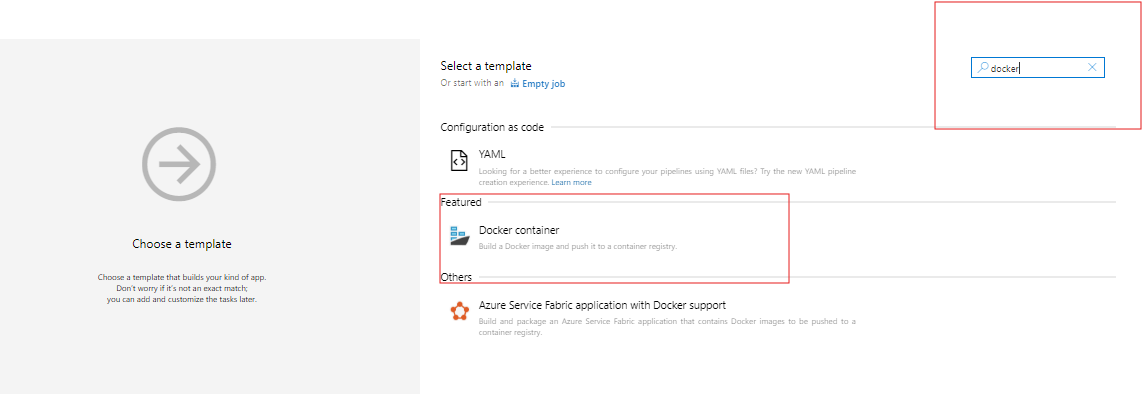

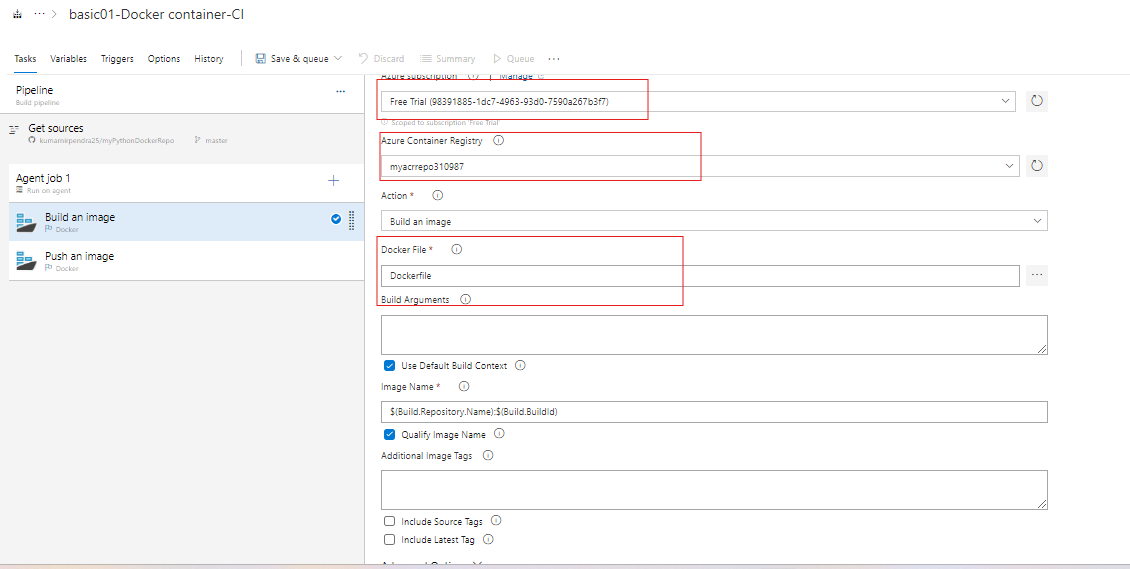
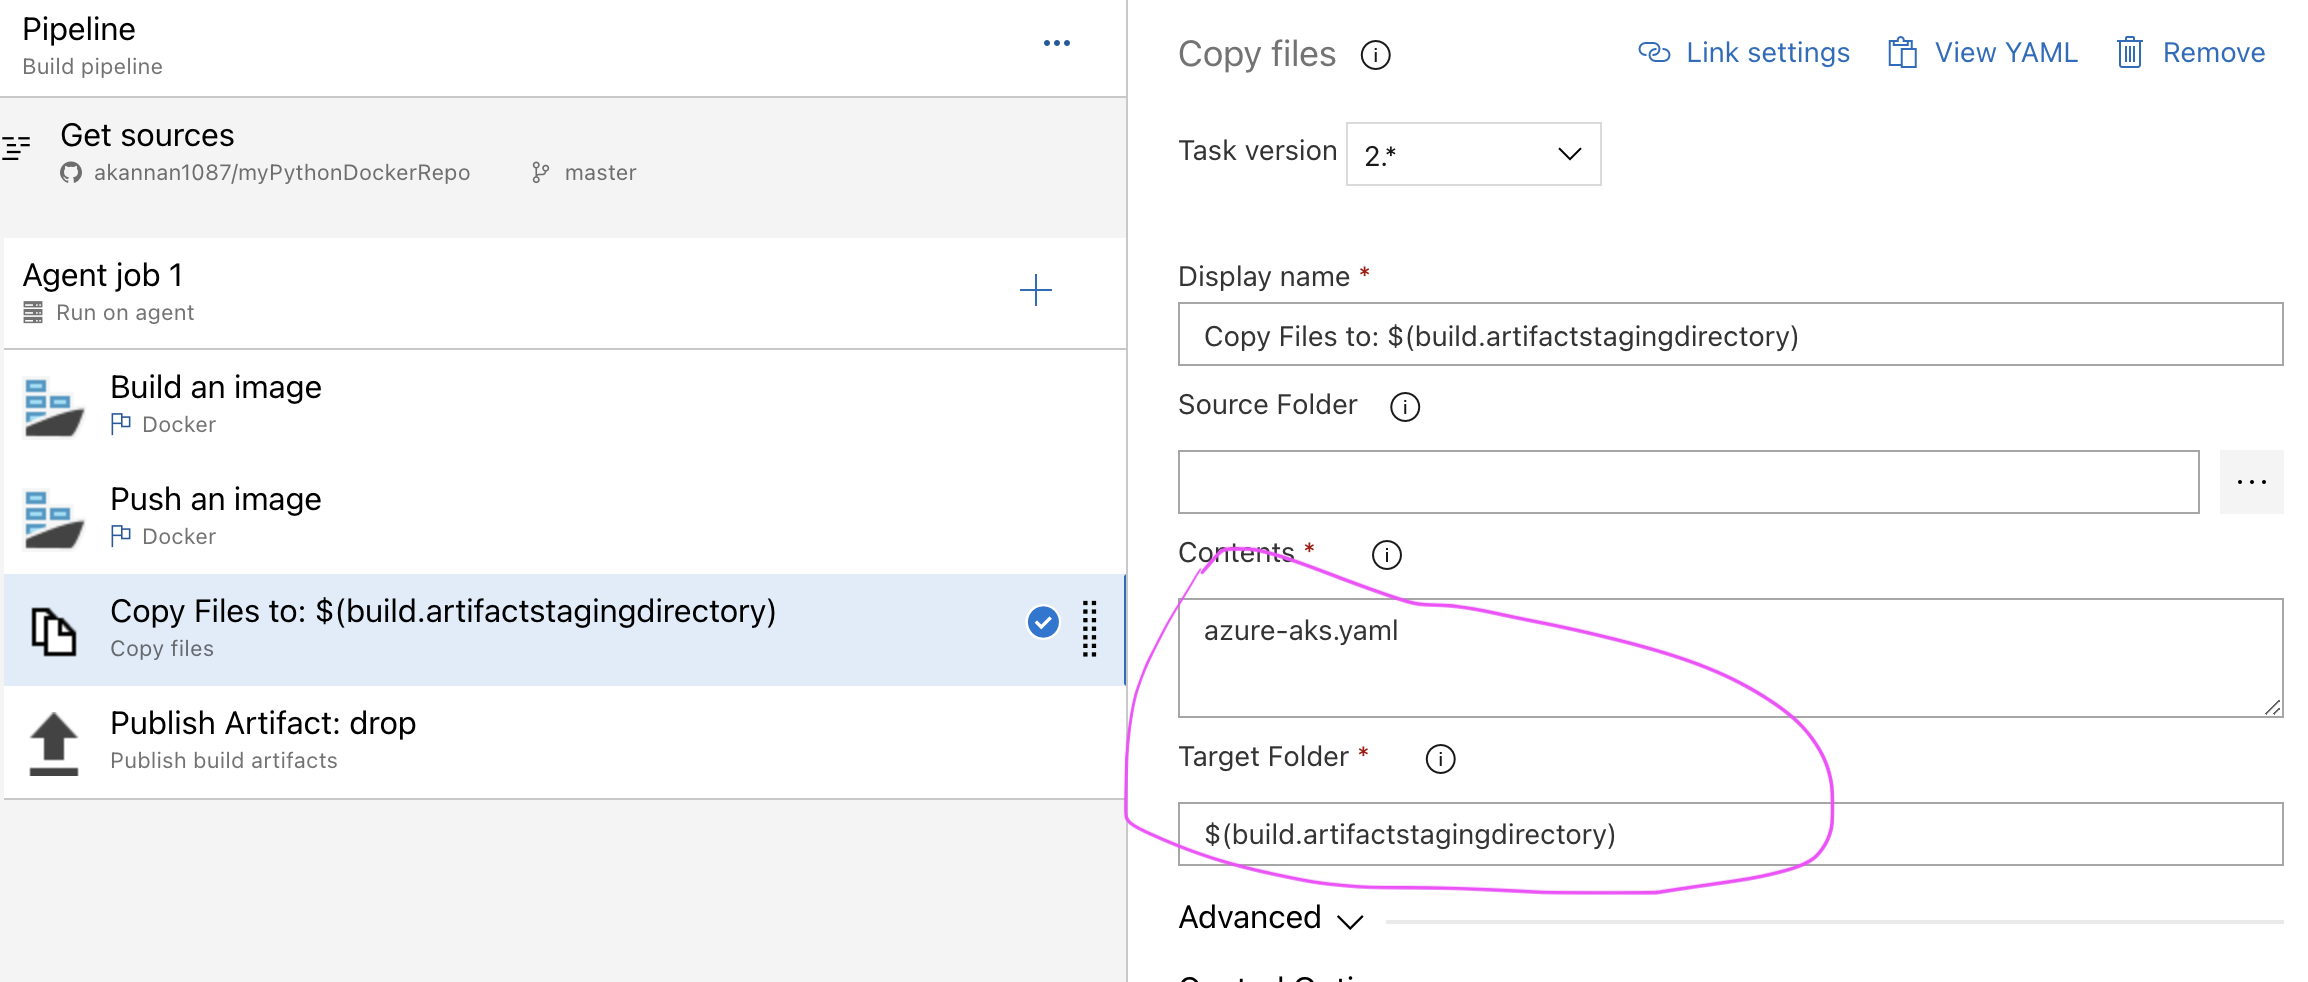
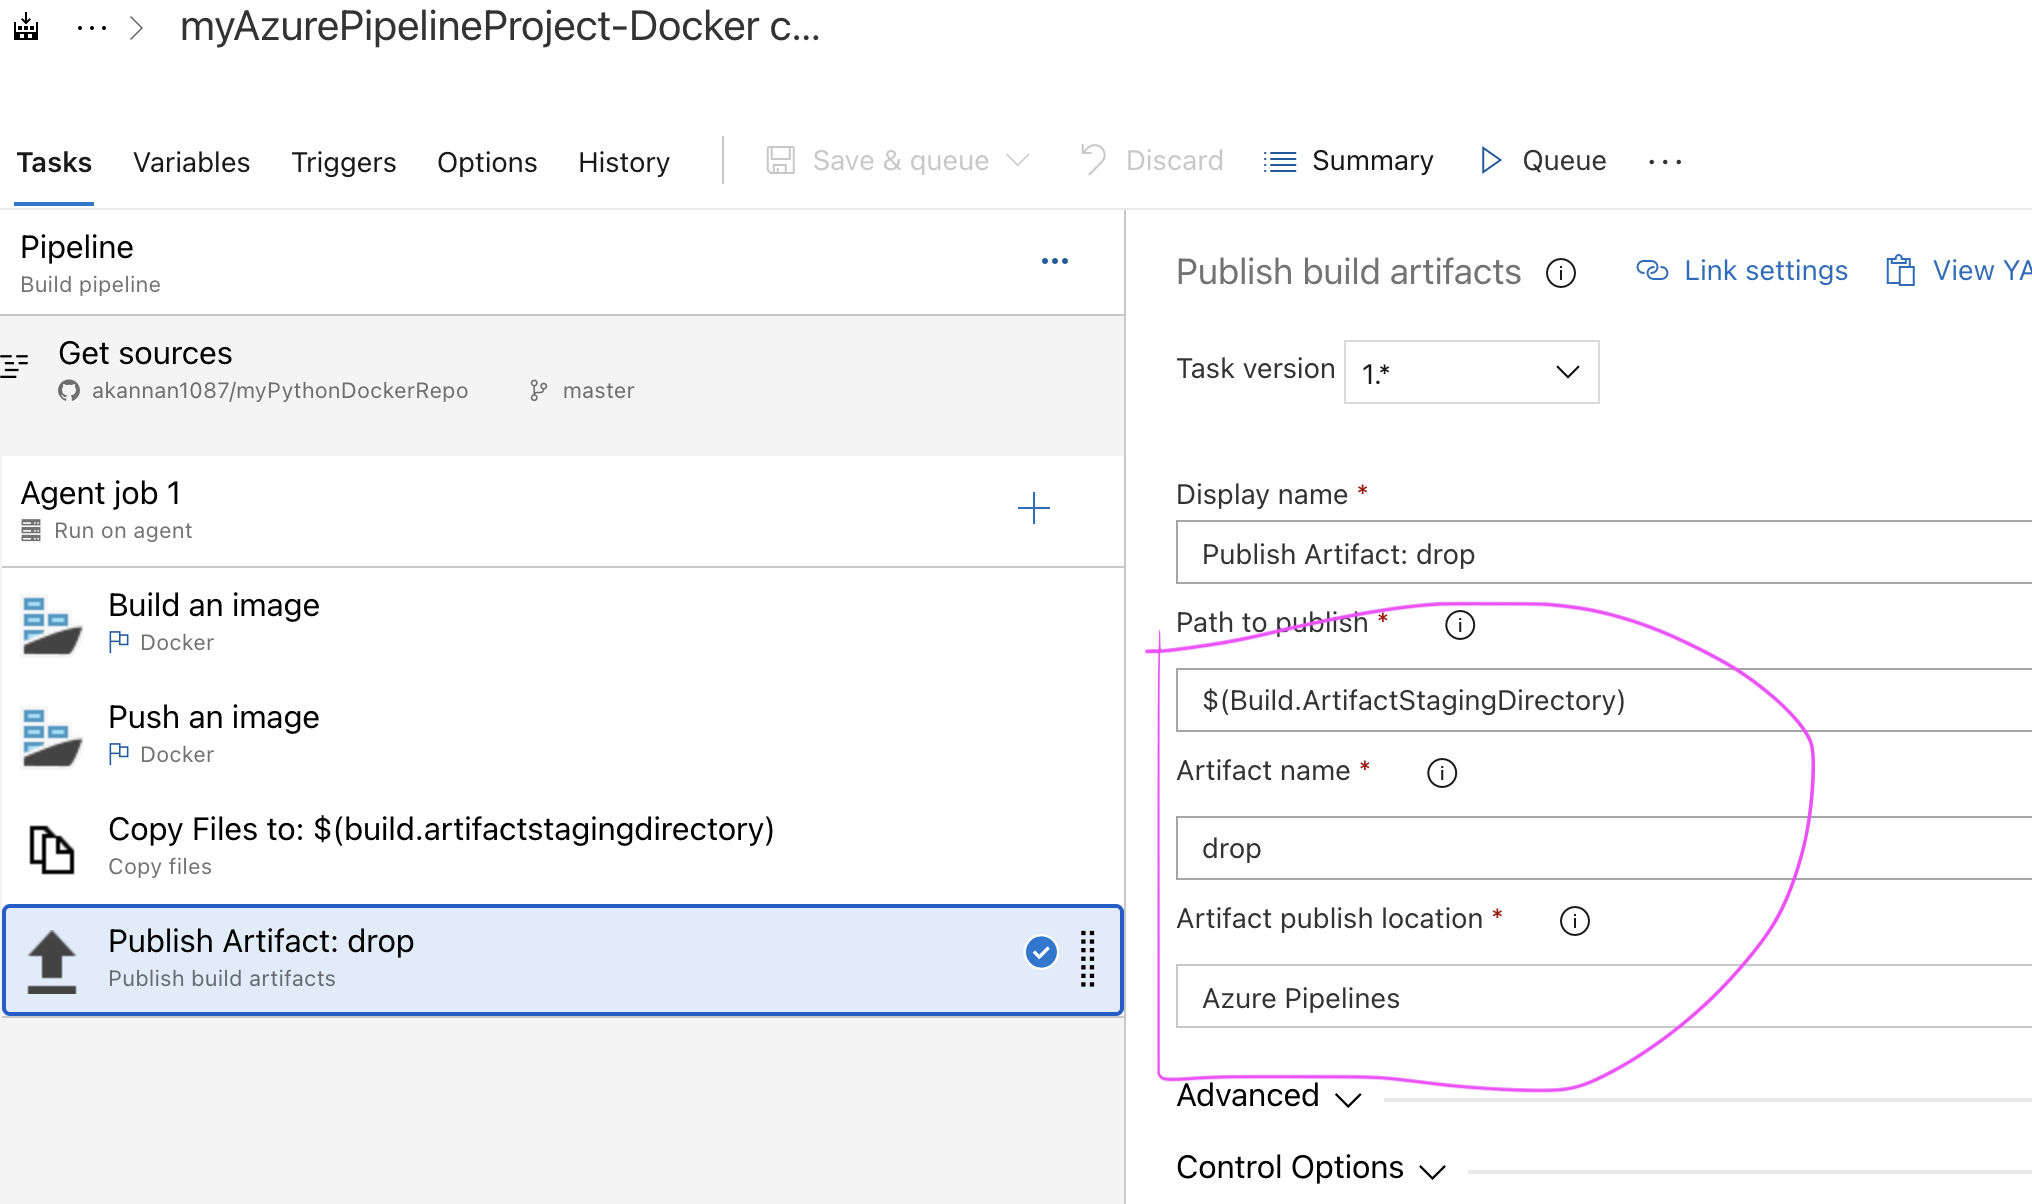
Sonarqube
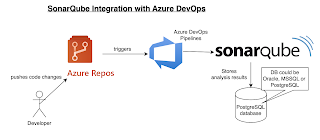
Integrate SonarQube with Azure DevOps
Prerequisites
- SonarQube must be up and running.
- A Java Project must be set up in Azure Repos.
- Install the SonarQube plug-in/Add-on in Azure DevOps using the following URL:
SonarQube Marketplace - Install Sonarqube on Docker
docker run -d -p 9000:9000 mc1arke/sonarqube-with-community-branch-plugin
Azure DevOps: Execution Plan – Multi-agent Parallelism
This section outlines the Execution Plan configuration for parallelism in Azure DevOps pipelines, specifically for setting up multiple agents to run tasks concurrently.
1. Parallelism Section
- None: No parallelism is used. The job runs on a single agent.
- Multi-configuration: Allows you to run multiple configurations in parallel (e.g., testing different environments or versions).
- Multi-agent: Runs the same task on multiple agents simultaneously. This is useful for distributing work (e.g., large build jobs) across multiple agents for faster execution.
2. Number of agents
- When Multi-agent is selected, specify the number of agents (from 1 to 99) that will run the job in parallel.
- For example, setting the Number of agents to
5means the pipeline will run the job on 5 agents concurrently. - This is ideal for parallel processing or distributing workload across multiple agents.
3. Continue on error
- If checked, the pipeline will continue running even if one agent encounters an error.
- This can be useful in scenarios where certain failures can be ignored, allowing the remaining agents to complete their tasks.
4. Timeout
- The Timeout specifies the maximum duration (in minutes) a job is allowed to run before being forcefully canceled.
- A value of
0means no timeout is set.
5. Job cancel timeout
- Specifies the time (in minutes) given for the job to perform any cleanup tasks before being forcefully canceled when the pipeline is stopped.
- A value of
0means no additional time is given for cleanup, and the job will be immediately canceled.
6. Dependencies
- You can configure dependencies on other jobs or steps. The current job will only run if its dependencies (other jobs or steps) complete successfully.
Use Case
This configuration is often used to run the same task on multiple agents in parallel, helping speed up processing or distribute workloads for larger tasks like builds or tests.
