part 4
Source click Here
Declarative Pipeline
First Pipeline
# Starter pipeline
# Start with a minimal pipeline that you can customize to build and deploy your code.
# Add steps that build, run tests, deploy, and more:
# https://aka.ms/yaml

trigger:
- master

pool:
  vmImage: ubuntu-latest

steps:
- script: echo Hello, world!
  displayName: 'Run a one-line script'

- script: |
    echo Add other tasks to build, test, and deploy your project.
    echo See https://aka.ms/yaml
  displayName: 'Run a multi-line script'
Azure DevOps Starter Pipeline Explanation
Trigger:
- The pipeline is set to trigger automatically when changes are pushed to the
masterbranch.
Pool:
- The pipeline will run on a virtual machine using the latest version of Ubuntu.
Steps:
- The steps section includes tasks that the pipeline will execute:
- The first step runs a simple script that prints “Hello, world!”.
- The second step runs a multi-line script that provides additional instructions.
Azure DevOps Pipeline Stages
In Azure DevOps pipelines, stages are major divisions within a pipeline that allow you to group jobs logically. Stages help in organizing the workflow and managing complex build and release processes. Each stage can contain one or more jobs and can have specific conditions that determine whether the stage runs.
Key Features of Stages
-
Logical Grouping:
- Stages group related jobs together. For example, you might have separate stages for Build, Test, and Deploy.
-
Sequential Execution:
- Stages run sequentially by default, meaning that one stage must complete successfully before the next stage begins. This order helps in managing dependencies and ensuring that earlier tasks are completed before moving on.
-
Parallel Execution:
- Within a stage, jobs can run in parallel, allowing multiple tasks to be executed simultaneously, which can speed up the overall pipeline execution time.
-
Conditions:
- You can define conditions on stages to control whether they should run based on specific criteria. For example, you might want to run a stage only if the previous stage was successful or if certain variables meet specific values.
-
Environment Deployment:
- Stages can include deployment jobs that target specific environments, allowing you to manage the deployment process as part of your CI/CD workflow.
Example of Stages in YAML Pipeline
Here’s an example YAML pipeline that illustrates the use of stages:
# Starter pipeline
# Start with a minimal pipeline that you can customize to build and deploy your code.
# Add steps that build, run tests, deploy, and more:
# https://aka.ms/yaml

trigger:
- main

pool:
  vmImage: ubuntu-latest

stages:
- stage: Build
  displayName: 'Build Stage'
  jobs:
  - job: BuildJob
    displayName: 'Build Job'
    steps:
    - script: echo Building the application...
      displayName: 'Build Step'

- stage: Test
  displayName: 'Test Stage'
  jobs:
  - job: TestJob
    displayName: 'Test Job'
    steps:
    - script: echo Running tests...
      displayName: 'Test Step'

- stage: Deploy
  displayName: 'Deploy Stage'
  jobs:
  - deployment: DeployWeb
    displayName: 'Deploy Job'
    environment: 'Production'
    strategy:
      runOnce:
        deploy:
          steps:
          - script: echo Deploying to production...
            displayName: 'Deploy Step'
Azure DevOps Pipeline Jobs
In Azure DevOps pipelines, jobs are a collection of steps that run sequentially on an agent. Jobs are essential for organizing tasks within a stage and can be configured to run on different agents or environments, allowing for flexible and efficient execution of your CI/CD processes.
Key Features of Jobs
-
Grouping of Steps:
- Jobs group related steps together, making it easier to manage and understand the workflow. For example, a job might include all the steps needed to build an application.
-
Sequential Execution:
- Steps within a job are executed sequentially. This means that each step must complete before the next step begins, ensuring that the tasks are performed in the correct order.
-
Agent Specification:
- You can specify the agent pool for each job, allowing you to choose the environment in which the job runs. This is particularly useful when different jobs require different software or configurations.
-
Parallel Execution:
- Multiple jobs can run in parallel within a stage, which can significantly speed up the overall execution time of the pipeline.
-
Conditions:
- Jobs can have conditions that control whether they should run based on the outcomes of previous jobs or other criteria. This allows for dynamic and flexible pipeline behavior.
-
Deployment Jobs:
- Special job types that are designed for deploying applications. These jobs can include additional features for managing deployment strategies and environments.
Example of Jobs in YAML Pipeline
Here’s an example YAML pipeline that illustrates the use of jobs:
stages:
- stage: Build
  displayName: 'Build Stage'
  jobs:
  - job: BuildJob
    displayName: 'Build Job'
    pool:
      vmImage: 'ubuntu-latest'
    steps:
    - script: echo Building the application...
      displayName: 'Build Step'
    - script: echo Build completed!
      displayName: 'Completion Step'

- stage: Test
  displayName: 'Test Stage'
  jobs:
  - job: TestJob
    displayName: 'Test Job'
    pool:
      vmImage: 'ubuntu-latest'
    steps:
    - script: echo Running tests...
      displayName: 'Test Step'

- stage: Deploy
  displayName: 'Deploy Stage'
  jobs:
  - deployment: DeployWeb
    displayName: 'Deploy Job'
    environment: 'Production'
    strategy:
      runOnce:
        deploy:
          steps:
          - script: echo Deploying to production...
            displayName: 'Deploy Step'
Azure DevOps Pipeline Steps and Scripts
In Azure DevOps pipelines, steps are the individual tasks that run as part of a job. Each step can execute a specific command or run a predefined task. Scripts are a common type of step that allows you to write custom commands or scripts to perform actions during the pipeline execution.
Key Features of Steps
-
Individual Tasks:
- Steps represent individual actions that are executed sequentially within a job. Each step must complete successfully for the subsequent steps to run.
-
Types of Steps:
- Steps can be of various types, including:
- Script Steps: Execute custom scripts or commands.
- Task Steps: Use built-in tasks provided by Azure DevOps or custom tasks defined in the marketplace.
- Inline Steps: Directly embed scripts or commands within the YAML file.
- Steps can be of various types, including:
-
Execution Order:
- Steps within a job are executed in the order they are defined. This ensures that tasks are completed in a predictable sequence.
-
Display Names:
- Each step can have a
displayNamethat provides a user-friendly description of the step’s purpose, making it easier to understand the pipeline when viewing logs or output.
- Each step can have a
Example of Steps and Scripts in YAML Pipeline
Here’s an example YAML pipeline that demonstrates the use of steps and scripts:
stages:
- stage: Build
  displayName: 'Build Stage'
  jobs:
  - job: BuildJob
    displayName: 'Build Job'
    pool:
      vmImage: 'ubuntu-latest'
    steps:
    - script: |
        echo Building the application...
        echo Build started at $(date)
      displayName: 'Build Step'

    - script: |
        echo Running unit tests...
        echo Test execution started at $(date)
      displayName: 'Test Step'

    - task: PublishPipelineArtifact@1
      inputs:
        targetPath: '$(Pipeline.Workspace)'
        artifact: 'drop'
        publishLocation: 'pipeline'
Azure DevOps Pipeline Variables
In Azure DevOps pipelines, variables are used to store values that can be reused throughout the pipeline. They help in managing configurations and can be particularly useful for maintaining consistency and avoiding hard-coded values in your YAML file.
Key Features of Variables
-
Reusability:
- Variables allow you to define values once and reuse them across different jobs, steps, or stages. This promotes DRY (Don’t Repeat Yourself) principles and makes maintenance easier.
-
Dynamic Values:
- Variables can store dynamic values that change during the pipeline execution, such as build numbers, commit IDs, or user inputs.
-
Variable Types:
- Pipeline Variables: Defined in the YAML file and available throughout the pipeline.
- Environment Variables: Set in the pipeline or agent and accessible to scripts and tasks.
- System Variables: Predefined variables provided by Azure DevOps that contain useful information about the pipeline and execution environment.
-
Variable Groups:
- You can group related variables into a variable group, making it easier to manage and reference them, especially for projects with multiple pipelines.
-
Expressions:
- Variables can be used in expressions to control conditions, define paths, and manage execution flow.
Defining User-Defined Variables
Pipeline-level Variables:
These variables are available across all jobs and steps in the pipeline.
Job-level Variables:
These variables are specific to a single job and are not available in other jobs.
Step-level Variables:
These variables are defined within a specific step and are limited to that step.
Example of user defined Variables in YAML Pipeline
Here’s an example YAML pipeline that demonstrates the use of variables:
trigger:
- main

pool:
  vmImage: ubuntu-latest

variables:
  buildConfiguration: 'Release'
  myVariable: 'Hello, Azure DevOps!'

stages:
- stage: Build
  displayName: 'Build Stage'
  jobs:
  - job: BuildJob
    displayName: 'Build Job'
    pool:
      vmImage: 'ubuntu-latest'
    steps:
    - script: echo "Building the application in $(buildConfiguration) mode."
      displayName: 'Build Configuration Step'

    - script: echo $(myVariable)
      displayName: 'Display Variable Step'
Example 02
trigger:
- none  # Only run the pipeline manually

variables:
  globalVar: 'This is a pipeline-wide variable'
  environment: 'dev'

jobs:
- job: Build
  displayName: "Build Job"
  variables:
    buildVar: 'This is a variable for the Build job'
    envVar: '$(environment)'  # Using pipeline-wide variable in a job
  pool:
    vmImage: 'ubuntu-latest'
  steps:
  - script: |
      echo "Global Variable: $(globalVar)"
      echo "Build Job Variable: $(buildVar)"
      echo "Environment Variable: $(envVar)"
    displayName: "Print Build Variables"

- job: Deploy
  displayName: "Deploy Job"
  dependsOn: Build  # Ensure the Build job runs before the Deploy job
  variables:
    deployVar: 'This is a variable for the Deploy job'
    envVar: '$(environment)'  # Using pipeline-wide variable in a different job
  pool:
    vmImage: 'ubuntu-latest'
  steps:
  - script: |
      echo "Global Variable: $(globalVar)"
      echo "Deploy Job Variable: $(deployVar)"
      echo "Environment Variable: $(envVar)"
    displayName: "Print Deploy Variables"
Key Differences
| Environment Variables | System Variables |
|---|---|
| Set by the user or defined in the pipeline or agent. | Predefined by Azure DevOps. |
| Can be used to control pipeline behavior or share values between tasks and jobs. | Provide information about the pipeline, agent, and repository. |
| Customizable by the user. | Fixed names and values set by the system. |
Parameterized Variables
Parameterized variables in Azure DevOps YAML pipelines allow you to pass values into your pipeline at runtime. This enables more dynamic and flexible pipeline execution by letting users provide specific inputs when triggering a pipeline.
Example of Parameterized Variables in YAML
trigger:
- main

pool:
  vmImage: ubuntu-latest
parameters:
  - name: buildConfiguration
    type: string
    default: 'Release'
    displayName: 'Build Configuration'

jobs:
- job: Build
  displayName: "Build Job"
  pool:
    vmImage: 'ubuntu-latest'
  steps:
  - script: |
      echo "Building with configuration: ${{ parameters.buildConfiguration }}"
    displayName: "Print Build Configuration"
Conditional Variables
Conditional variables in Azure DevOps allow you to set variable values based on certain conditions or states within your pipeline. This enables dynamic behavior and customization depending on various factors such as the branch being built, the success or failure of previous jobs, and more.
Example 1: Set Variable Based on Branch Name
You can set a variable that changes based on the branch being built:
Set Variable Based on Job Status
variables:
  deployEnvironment: ${{ if eq(variables['Build.Reason'], 'Manual') }}:
    'Production'
  else:
    'Staging'

jobs:
- job: Build
  displayName: "Build Job"
  pool:
    vmImage: 'ubuntu-latest'
  steps:
  - script: |
      echo "Deploy environment: $(deployEnvironment)"
    displayName: "Print Deploy Environment"
Using Conditions in Job Execution
variables:
  isRelease: true

jobs:
- job: Build
  displayName: "Build Job"
  pool:
    vmImage: 'ubuntu-latest'
  steps:
  - script: |
      echo "Building the project..."
    displayName: "Build Project"

- job: Deploy
  displayName: "Deploy Job"
  condition: and(succeeded(), eq(variables['isRelease'], 'true'))
  pool:
    vmImage: 'ubuntu-latest'
  steps:
  - script: |
      echo "Deploying to production..."
    displayName: "Deploy to Production"
Job Dependencies with dependsOn
In Azure DevOps YAML pipelines, the dependsOn keyword allows you to specify job dependencies, meaning a job will only run after the specified jobs have completed. This is useful for organizing workflows and ensuring certain jobs complete before others begin.
Example 1: Basic Job Dependency
In this example, the Deploy job depends on the Build job:
jobs:
- job: Build
  displayName: "Build Job"
  pool:
    vmImage: 'ubuntu-latest'
  steps:
  - script: |
      echo "Building the project..."
    displayName: "Build Project"

- job: Deploy
  displayName: "Deploy Job"
  dependsOn: Build
  pool:
    vmImage: 'ubuntu-latest'
  steps:
  - script: |
      echo "Deploying the project..."
    displayName: "Deploy Project"
Conditional Execution with Dependencies
jobs:
- job: Build
  displayName: "Build Job"
  pool:
    vmImage: 'ubuntu-latest'
  steps:
  - script: |
      echo "Building the project..."
    displayName: "Build Project"

- job: Deploy
  displayName: "Deploy Job"
  dependsOn: Build
  condition: succeeded()  # Deploy only if Build is successful
  pool:
    vmImage: 'ubuntu-latest'
  steps:
  - script: |
      echo "Deploying the project..."
    displayName: "Deploy Project"

- job: Notify
  displayName: "Notify Job"
  dependsOn: Deploy
  pool:
    vmImage: 'ubuntu-latest'
  steps:
  - script: |
      echo "Notifying the team about the deployment..."
    displayName: "Send Notification"
Multiple Job Dependencies
jobs:
- job: Build
  displayName: "Build Job"
  pool:
    vmImage: 'ubuntu-latest'
  steps:
  - script: |
      echo "Building the project..."
    displayName: "Build Project"

- job: Deploy
  displayName: "Deploy Job"
  dependsOn: Build
  pool:
    vmImage: 'ubuntu-latest'
  steps:
  - script: |
      echo "Deploying the project..."
    displayName: "Deploy Project"

- job: Test
  displayName: "Test Job"
  dependsOn:
    - Build
    - Deploy
  pool:
    vmImage: 'ubuntu-latest'
  steps:
  - script: |
      echo "Running tests..."
    displayName: "Run Tests"
Deployment with Approval Gates
stages:
- stage: Build
  jobs:
  - job: Build
    pool:
      vmImage: 'ubuntu-latest'
    steps:
    - script: |
        echo "Building the project..."
      displayName: "Build Project"

- stage: Deploy
  jobs:
  - job: Deploy
    pool:
      vmImage: 'ubuntu-latest'
    steps:
    - script: |
        echo "Deploying to production..."
      displayName: "Deploy to Production"
    approvals:
      - approvals:
          - approver:
              id: user@example.com
Azure DevOps Templates
Azure DevOps templates allow you to create reusable components for your pipelines. They help maintain consistency across pipelines and reduce redundancy by allowing you to define common steps or jobs in a single location.
Types of Templates
- Pipeline Templates: Define a complete pipeline structure that can be reused in different scenarios.
- Job Templates: Define a reusable job that can be included in multiple pipelines.
- Step Templates: Define a reusable set of steps that can be included in jobs.
Creating a Template
To create a template, define the YAML structure you want to reuse and save it in a repository.
Example: Pipeline Template
# template-pipeline.yaml
parameters:
  - name: environment
    type: string

jobs:
- job: Build
  pool:
    vmImage: 'ubuntu-latest'
  steps:
  - script: |
      echo "Building in the ${{ parameters.environment }} environment."
    displayName: "Build Job"
Using a Pipeline Template
# main-pipeline.yaml
resources:
  repositories:
    - repository: templates
      type: git
      name: MyProject/Templates

jobs:
- template: template-pipeline.yaml@templates
  parameters:
    environment: 'production'
Job Template Definition
# job-template.yaml
parameters:
  - name: jobName
    type: string

jobs:
- job: ${{ parameters.jobName }}
  pool:
    vmImage: 'ubuntu-latest'
  steps:
  - script: |
      echo "Executing job: ${{ parameters.jobName }}"
    displayName: "Job ${{ parameters.jobName }}"
Using the Job Template
# main-pipeline.yaml
jobs:
- template: job-template.yaml
  parameters:
    jobName: 'BuildJob'
- template: job-template.yaml
  parameters:
    jobName: 'TestJob'
Multiple Scheduled Triggers
trigger: none  # Disabling CI triggers

schedules:
- cron: "0 0 * * *"  # Every day at midnight
displayName: Daily midnight build
branches:
  include:
    - main
- cron: "0 17 * * 5"  # Every Friday at 5 PM
displayName: Weekly Friday build
branches:
  include:
    - main

pool:
vmImage: 'ubuntu-latest'

jobs:
- job: Build
steps:
- script: echo "Running scheduled build on $(Build.SourceBranch) at $(Build.SourceBranchName)"
Pipeline with single stage with multiple jobs
```yaml
trigger:
  branches:
    include:
      - main

stages:
- stage: BuildAndTest
  jobs:
  - job: BuildJob
    displayName: "Build the application"
    pool:
      vmImage: 'ubuntu-latest'
    steps:
    - script: echo "Building the application"
    - script: echo "Compile the code"
    - script: echo "Build process completed"

  - job: TestJob
    displayName: "Test the application"
    pool:
      vmImage: 'ubuntu-latest'
    steps:
    - script: echo "Running unit tests"
    - script: echo "Test process completed"
    ```
    ### Pipeline with Multiple Stages
    ```yaml
    trigger:
  branches:
    include:
      - main

stages:
- stage: Build
  displayName: "Build Stage"
  jobs:
  - job: BuildApp
    displayName: "Build the application"
    pool:
      vmImage: 'ubuntu-latest'
    steps:
    - script: echo "Building the application"
    - script: echo "Compile the code"
    - script: echo "Build process completed"

- stage: Test
  displayName: "Test Stage"
  dependsOn: Build  # Runs only after Build stage succeeds
  jobs:
  - job: UnitTest
    displayName: "Run Unit Tests"
    pool:
      vmImage: 'ubuntu-latest'
    steps:
    - script: echo "Running unit tests"
    - script: echo "Unit tests completed"

- stage: Deploy
  displayName: "Deploy Stage"
  dependsOn: Test  # Runs only after Test stage succeeds
  jobs:
  - job: DeployApp
    displayName: "Deploy the application"
    pool:
      vmImage: 'ubuntu-latest'
    steps:
    - script: echo "Deploying the application"
    - script: echo "Deployment process completed"
Pipeline with Conditional Jobs
 trigger:
branches:
  include:
    - main
    - develop

stages:
- stage: Build
jobs:
- job: BuildJob
  pool:
    vmImage: 'ubuntu-latest'
  steps:
  - script: echo "Building the application"

- stage: Test
dependsOn: Build
jobs:
- job: UnitTests
  condition: eq(variables['Build.SourceBranch'], 'refs/heads/main')  # Run only on the main branch
  pool:
    vmImage: 'ubuntu-latest'
  steps:
  - script: echo "Running unit tests on the main branch"

- job: IntegrationTests
  condition: succeeded()  # Only run if previous jobs succeeded
  pool:
    vmImage: 'ubuntu-latest'
  steps:
  - script: echo "Running integration tests"
Parallel Jobs in a Stage
 trigger:
  branches:
    include:
      - main

stages:
- stage: Build
  jobs:
  - job: BuildJob
    pool:
      vmImage: 'ubuntu-latest'
    steps:
    - script: echo "Building the application"

- stage: Test
  dependsOn: Build
  jobs:
  - job: UnitTests
    pool:
      vmImage: 'ubuntu-latest'
    steps:
    - script: echo "Running unit tests"

  - job: IntegrationTests
    pool:
      vmImage: 'ubuntu-latest'
    steps:
    - script: echo "Running integration tests"
Pipeline with Tasks (Build, Test, Deploy)
trigger:
  branches:
    include:
      - main

stages:
- stage: Build
  jobs:
  - job: BuildJob
    displayName: "Build the .NET application"
    pool:
      vmImage: 'windows-latest'
    steps:
    - task: UseDotNet@2
      inputs:
        packageType: 'sdk'
        version: '6.x'
    - task: DotNetCoreCLI@2
      inputs:
        command: 'build'
        projects: '**/*.csproj'

- stage: Test
  dependsOn: Build
  jobs:
  - job: TestJob
    displayName: "Test the .NET application"
    pool:
      vmImage: 'windows-latest'
    steps:
    - task: DotNetCoreCLI@2
      inputs:
        command: 'test'
        projects: '**/*.csproj'

- stage: Deploy
  dependsOn: Test
  jobs:
  - job: DeployJob
    displayName: "Deploy the .NET application"
    pool:
      vmImage: 'windows-latest'
    steps:
    - task: AzureRmWebAppDeployment@4
      inputs:
        azureSubscription: 'MyAzureSubscription'
        appType: 'webApp'
        WebAppName: 'my-web-app'
Azure DevOps Deployment Strategies
Azure DevOps provides several deployment strategies to ensure reliable and efficient application deployment. This guide outlines the common strategies and their implementation steps.
Common Deployment Strategies
- Blue-Green Deployment
- Canary Deployment
- Rolling Deployment
- Recreate Deployment
1. Blue-Green Deployment
Overview
Blue-Green deployment minimizes downtime and risk by running two identical environments. Only one environment (Blue or Green) is live at any time.
Steps
- Set Up Two Environments: Create two identical environments (e.g., Blue and Green).
- Deploy to Idle Environment:
- Deploy the new version of the application to the idle environment (e.g., Green).
- Switch Traffic:
- Update the routing to direct traffic from the current environment (Blue) to the new environment (Green).
- Monitor:
- Monitor the new environment for any issues.
- Rollback (if needed):
- If issues are found, switch back traffic to the old environment (Blue).
2. Canary Deployment
Overview
Canary deployment allows you to release new features to a small subset of users before rolling them out to the entire user base.
Steps
- Deploy New Version to a Small Subset:
- Deploy the new version of the application to a small percentage of users (e.g., 5%).
- Monitor Performance:
- Monitor the performance and user feedback of the canary release.
- Incremental Rollout:
- Gradually increase the percentage of users receiving the new version if the canary release is successful.
- Full Rollout:
- Once confidence is established, roll out the new version to all users.
- Rollback (if needed):
- If issues arise, quickly revert the canary deployment.
3. Rolling Deployment
Overview
Rolling deployment gradually replaces instances of the previous version of the application with the new version without downtime.
Steps
- Set Up Multiple Instances: Ensure you have multiple instances of the application running.
- Deploy New Version to One Instance:
- Start by updating one instance with the new version.
- Monitor Instance:
- Monitor the updated instance for any issues.
- Continue Updating Remaining Instances:
- If the updated instance is successful, continue to update the next instance.
- Complete Deployment:
- Repeat until all instances are updated.
4. Recreate Deployment
Overview
Recreate deployment involves stopping the current version of the application and starting the new version, resulting in downtime.
Steps
- Stop the Current Application:
- Shut down the existing application instance.
- Deploy the New Version:
- Deploy the new version of the application.
- Start the New Application:
- Start the new version of the application.
- Monitor:
- Monitor the application for issues after deployment.
Summary
Choosing the right deployment strategy depends on your application requirements and the level of risk you are willing to accept. Azure DevOps provides the flexibility to implement any of these strategies based on your deployment needs.
Tasks
CodeBase https://github.com/kumarnirpendra25/t1-student-maven-proj.git
Task 1 Maven Project
trigger:
- master
pool:
  vmimage: ubuntu-latest
stages:
  - stage: build
    displayName: build
    jobs:
    - job: build
      displayName: build
      steps:
        - task: Maven@4
          inputs:
            mavenPomFile: 'pom.xml'
            publishJUnitResults: false
            javaHomeOption: 'JDKVersion'
            mavenVersionOption: 'Default'
            mavenAuthenticateFeed: false
            effectivePomSkip: false
            sonarQubeRunAnalysis: false
            goals: package

        - task: CopyFiles@2
          inputs:
            SourceFolder: '$(agent.builddirectory)'
            Contents: '**/*.war'
            TargetFolder: '$(build.artifactstagingdirectory)'
        - task: PublishBuildArtifacts@1
          inputs:
            PathtoPublish: '$(Build.ArtifactStagingDirectory)'
            ArtifactName: 'drop'
            publishLocation: 'Container'
  - stage: Release
    displayName: Release
    jobs:
    - deployment:
      environment: dev
      strategy:
       runOnce:
         deploy:
           steps:
             - task: AzureRmWebAppDeployment@4
               inputs:
                 ConnectionType: 'AzureRM'
                 azureSubscription: 'Free Trial(98391885-1dc7-4963-93d0-7590a267b3f7)'
                 appType: 'webAppLinux'
                 WebAppName: 'web000'
                 packageForLinux: '$(Pipeline.Workspace)/**/*.war'
Azure Devops Templates
Prerequisite
To better understand ADO template we must have basic understanding of YAML pipeline.
- Stages
- Jobs
- Steps
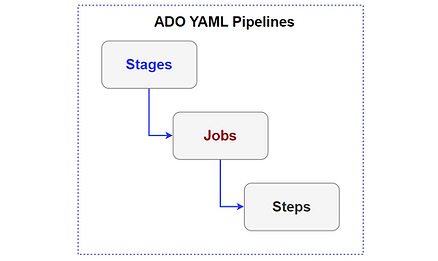
What is a Template in ADO YAML
A template in Azure DevOps YAML allows you to create reusable content that can be shared across multiple teams or projects.
Using templates, we can define sharable content, logic, and parameters within a YAML pipeline.
Why Use ADO YAML Templates
- Speed up development
- Secure pipelines
- Cleaner YAML pipeline code
- Avoid duplicating the same logic in multiple places
Types of Templates
- Include: Insert reusable control
- Extends: Insert specific elements and define logic for other templates to follow
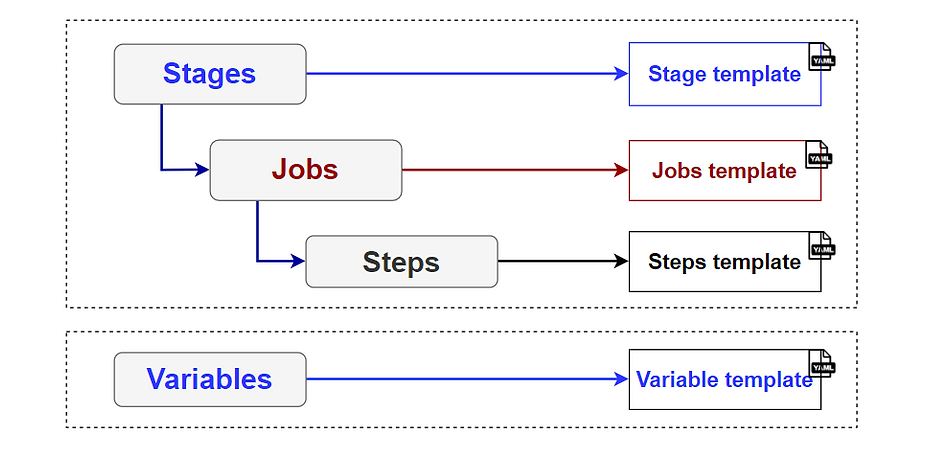
Template Categories
- Stage template
- Job template
- Step template
- Variable template
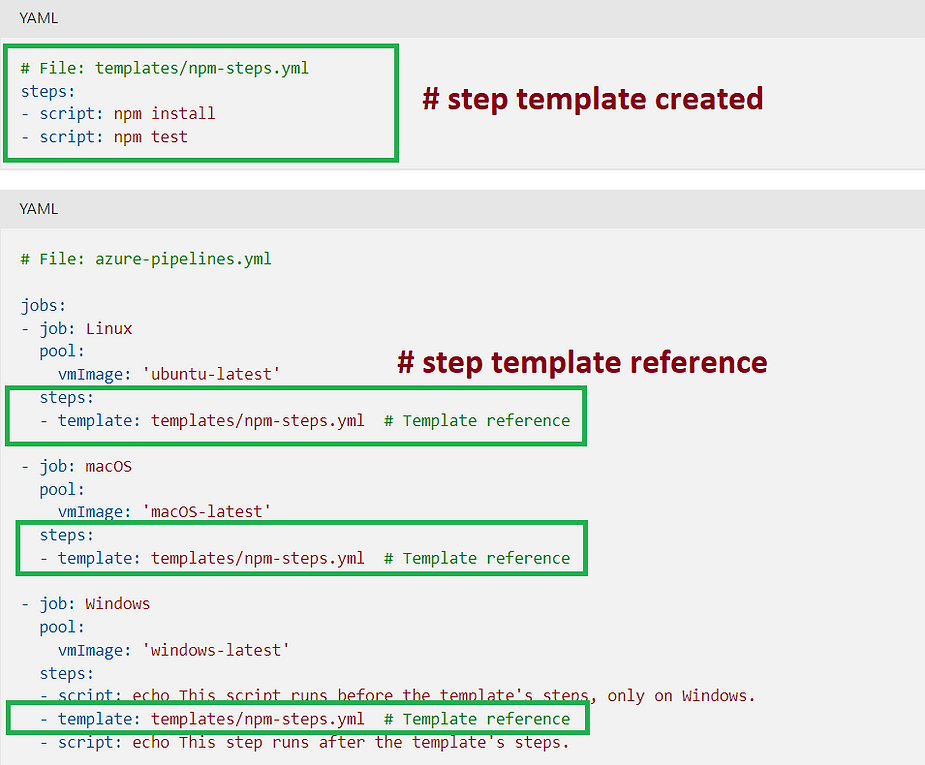
step template syntax
Now lets understand how we can create step template and how it can be referred from another yaml pipeline file.
step template helps to group all the steps that can be sharable in many jobs or stages.
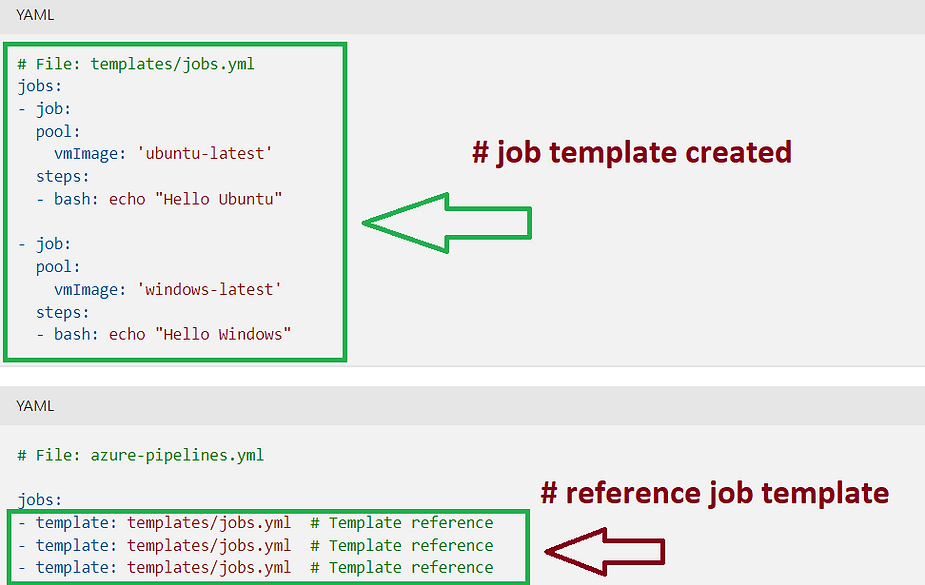
job template syntax
job template helps to group all the Jobs that can be sharable in many jobs and stages
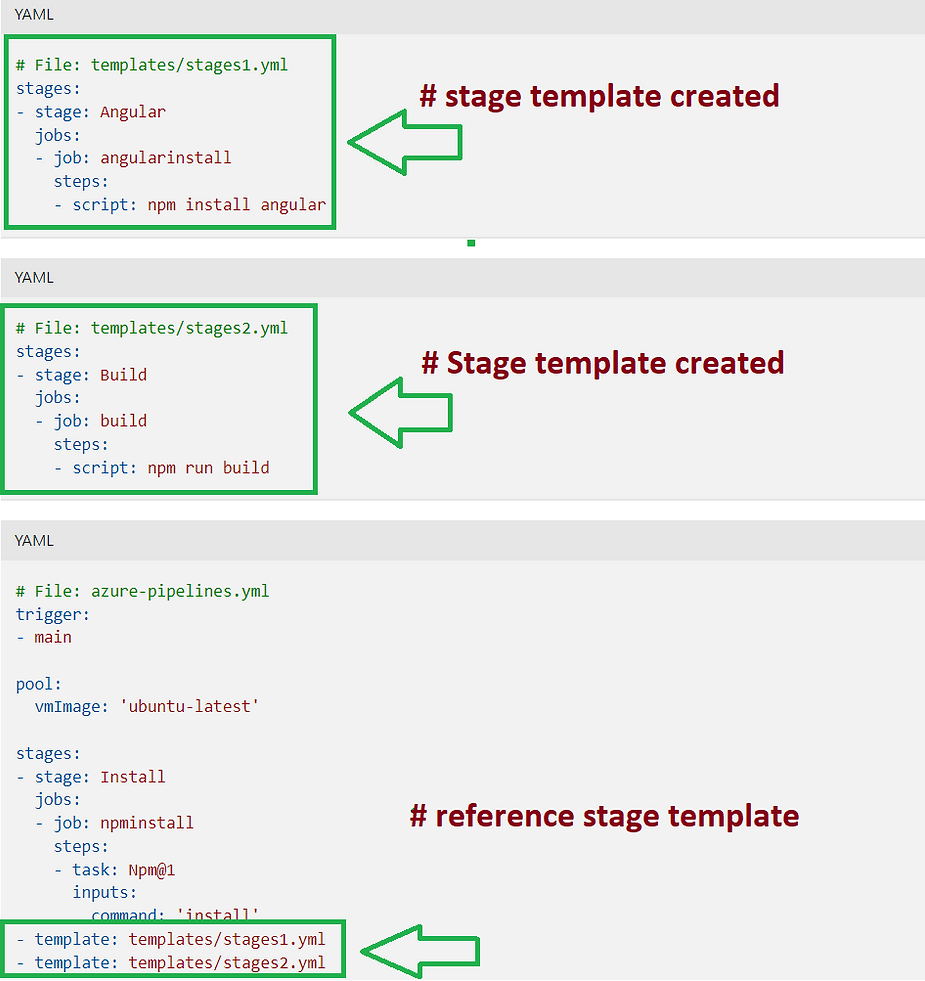
stage template syntax
stage template helps to group all the stages that can be sharable reference in many master pipeline.
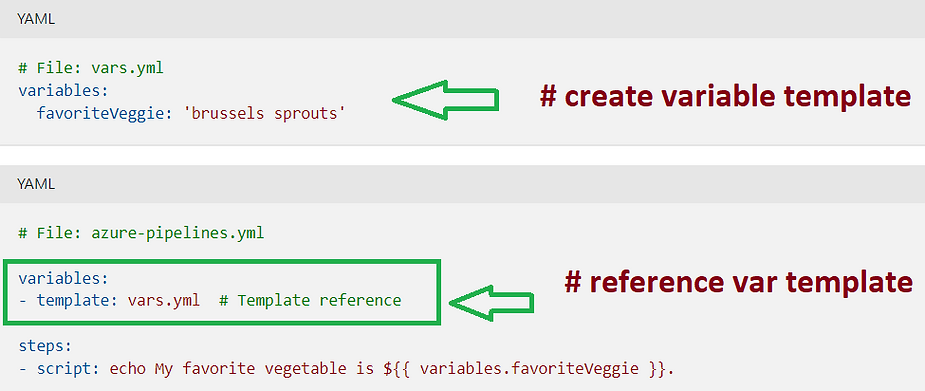
variable template syntax
variable template helps to group all the variables that can be referenced in pipeline.
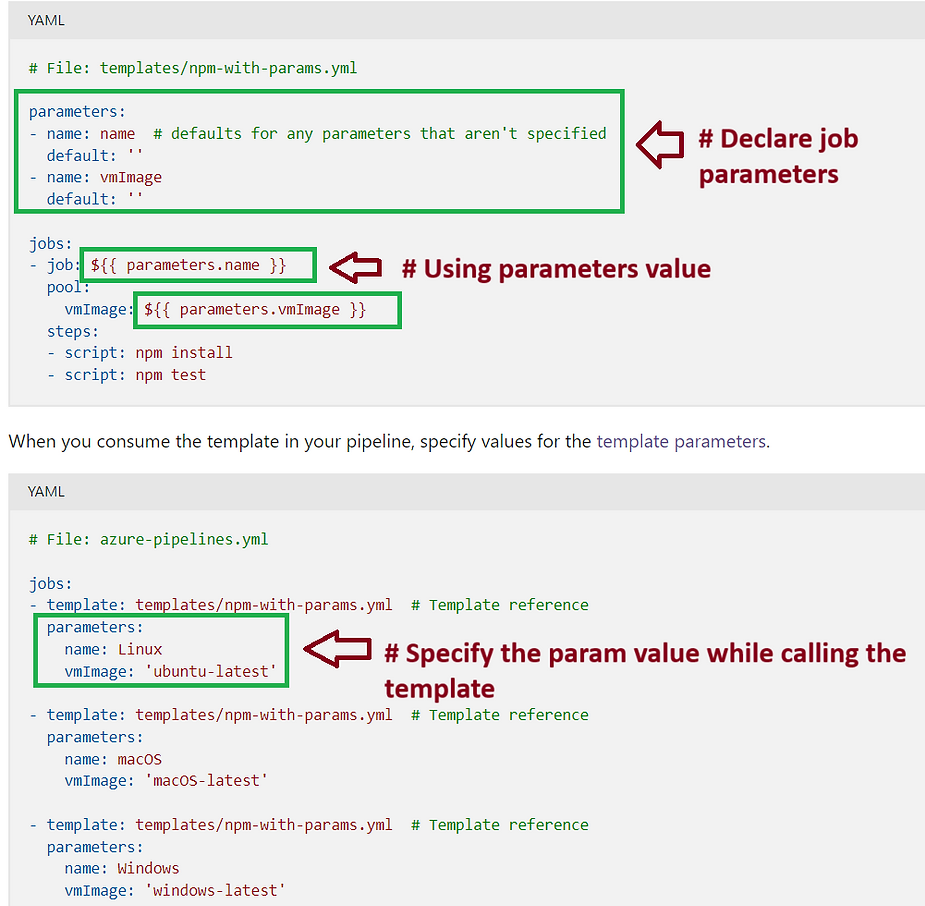
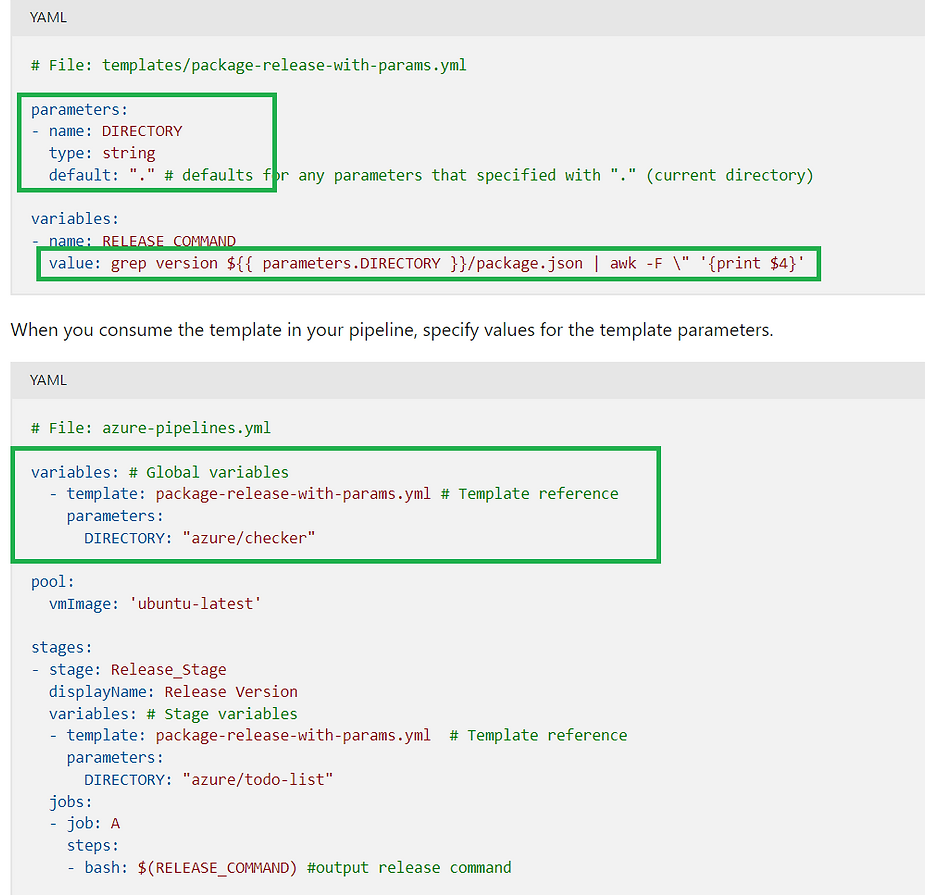
Create template with parameters
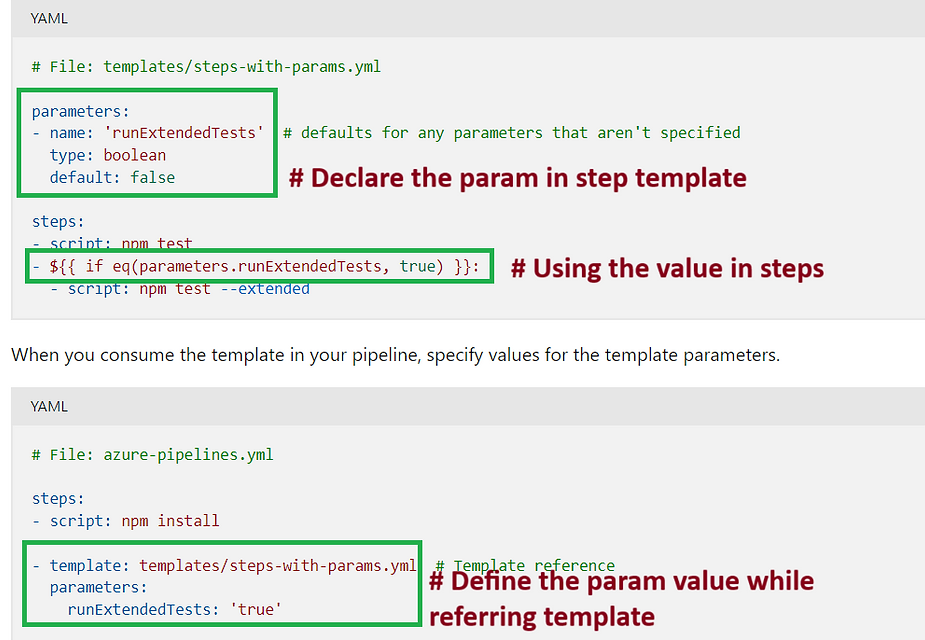
In some scenario you are required to pass some parameters to the template. We can create parameters with all types of template like step, stage, jobs, variables.
In this case we need to declare and define the parameters in two files.
In template file
the file from which template file is being called.
example:
- Job Template with parameters example
Steps Template with parameters example
Variables Template with parameters example
Create a template at step level
steps:
- script: echo Hello, world!
  displayName: 'Run a one-line script'

- script: |
    echo Add other tasks to build, test, and deploy your project.
    echo See https://aka.ms/yaml
  displayName: 'Run a multi-line script'
How to use ?
trigger:
- master

pool:
  vmImage: ubuntu-latest

steps:
- template: temp.yaml
Stage Level Template
# build-stage.yml
parameters:
  - name: vmImage
    type: string
    default: 'ubuntu-latest'
  - name: buildConfiguration
    type: string
    default: 'Release'

stages:
  - stage: Build
    displayName: 'Build Stage'
    jobs:
      - job: BuildJob
        pool:
          vmImage: ${{ parameters.vmImage }}
        steps:
          - checkout: self
          - script: echo "Building with ${{ parameters.buildConfiguration }} configuration."
How to use in a pipeline ?
trigger:
  branches:
    include:
      - main

stages:
  - template: temp.yaml
    parameters:
      stageName: 'Build'
      pool: Azure Pipelines
      vmImage: 'ubuntu-latest'
      jobs:
        - job: BuildJob
          steps:
            - task: UseDotNet@2
              inputs:
                packageType: 'sdk'
                version: '6.x'
            - script: dotnet build
              displayName: 'Build project'

  - template: temp.yaml
    parameters:
      stageName: 'Deploy'
      pool: Azure Pipelines
      vmImage: 'ubuntu-latest'
      jobs:
        - job: DeployJob
          steps:
            - script: echo "Deploying application..."
              displayName: 'Deployment Steps'
Job Level Template
parameters:
  - name: jobName
    type: string
  - name: displayName
    type: string
  - name: steps
    type: stepList

jobs:
  - job: ${{ parameters.jobName }}
    displayName: ${{ parameters.displayName }}
    steps: ${{ parameters.steps }}
How to use this ?
Stage level Template
parameters:
  - name: stageName
    type: string
  - name: pool
    type: string
  - name: vmImage
    type: string
  - name: jobs
    type: jobList

stages:
  - stage: ${{ parameters.stageName }}
    displayName: 'Stage - ${{ parameters.stageName }}'
    pool:
      name: ${{ parameters.pool }}
      vmImage: ${{ parameters.vmImage }}
    jobs: ${{ parameters.jobs }}
Dependencies
-
By default, a job or stage runs if it doesn’t depend on any other job or stage, or if all its dependencies completed and succeeded. This requirement applies not only to direct dependencies, but to their indirect dependencies, computed recursively.
-
By default, a step runs if nothing in its job failed yet and the step immediately preceding it completed.
-
You can override or customize this behavior by forcing a stage, job, or step to run even if a previous dependency fails, or by specifying a custom condition.
Conditions under which a stage, job, or step runs
-
In the pipeline definition YAML, you can specify the following conditions under which a stage, job, or step runs:
-
Only when all previous direct and indirect dependencies with the same agent pool succeed. If you have different agent pools, those stages or jobs run concurrently. This condition is the default if no condition is set in the YAML.
-
Even if a previous dependency fails, unless the run is canceled. Use succeededOrFailed() in the YAML for this condition.
-
Even if a previous dependency fails, and even if the run is canceled. Use always() in the YAML for this condition.
-
Only when a previous dependency fails. Use failed() in the YAML for this condition.
Example 1
trigger:
    - main

stages:
- stage: Build
  jobs:
    - job: BuildJob
      displayName: "Building Project"
      steps:
        - script: echo "Building..."

- stage: Test
  dependsOn: Build
  jobs:
    - job: TestJob
      displayName: "Running Tests"
      steps:
        - script: echo "Testing..."

- stage: Deploy
  dependsOn:
    - Build
    - Test
  jobs:
    - job: DeployJob
      displayName: "Deploying Project"
      steps:
        - script: echo "Deploying..."
Example 1
jobs:
- job: Foo

  steps:
  - script: echo Hello!
    condition: always() # this step runs, even if the build is canceled

- job: Bar
  dependsOn: Foo
  condition: failed() # this job runs only if Foo fails
Azure DevOps YAML Pipeline Timeout Examples
1. Setting timeoutInMinutes for Jobs
jobs:
- job: JobA
displayName: “Job A with Timeout”
timeoutInMinutes: 10 # Job will timeout after 10 minutes
steps:
- script: echo “Running Job A”
- script: sleep 600 # Simulating a long-running process
2. Setting timeoutInMinutes for Stages
stages:
- stage: Build
displayName: “Build Stage with Timeout”
timeoutInMinutes: 20 # Stage will timeout after 20 minutes
jobs:
- job: BuildJob
steps:
- script: echo “Building…”
- job: BuildJob
steps:
3. Using cancelTimeoutInMinutes for Graceful Cancellation
jobs:
- job: JobA
displayName: “Job with Cancellation Timeout”
timeoutInMinutes: 15
cancelTimeoutInMinutes: 5 # Grace period of 5 minutes for cancellation
steps:
- script: echo “Running Job A”
Notes:
- The default timeout for jobs is 60 minutes if
timeoutInMinutesis not specified. cancelTimeoutInMinutessets a grace period for cancellation, allowing jobs to wrap up before force termination.
Scheduled Job Example
trigger: none
schedules:
  - cron: "0 0 * * *"
    displayName: Daily build
    branches:
      include:
        - main
    always: true

pool:
  vmImage: 'ubuntu-latest'

steps:
  - script: echo "Scheduled Build Running"
    displayName: 'Scheduled Trigger Example'
Accessing Azure Key Vault Secrets using Azure DevOps Pipelines
Demoing the use of Azure Key Vault Secrets within Azure DevOps Pipelines.
1) Create Azure Key Vault with Secrets and persmissions
The following script will create a Key Vault and Secret:
# create the variables
KEYVAULT_RG="rg-keyvault-devops"
KEYVAULT_NAME="keyvault019"
SUBSCRIPTION_ID=$(az account show --query id -o tsv)

### create new resource group
az group create -n rg-keyvault-devops -l westeurope

### create key vault with RBAC option (not Access Policy)
az keyvault create --name $KEYVAULT_NAME \
   --resource-group $KEYVAULT_RG \
   --enable-rbac-authorization
### assign RBAC role to the current user to manage secrets
USER_ID=$(az ad signed-in-user show --query objectId -o tsv)

KEYVAULT_ID=$(az keyvault show --name $KEYVAULT_NAME \
   --resource-group $KEYVAULT_RG \
   --query id \
   --output tsv)

az role assignment create --role "Key Vault Secrets Officer" \
   --scope $KEYVAULT_ID \
   --assignee-object-id $USER_ID
### create a secret
az keyvault secret set --name "DatabasePassword" \
  --value "mySecretPassword" \
  --vault-name $KEYVAULT_NAME
2) Create Service Principal to access Key Vault from Azure DevOps Pipelines
### create a service principal
SPN=$(az ad sp create-for-rbac -n "spn-keyvault-devops")

echo $SPN | jq .

SPN_APPID=$(echo $SPN | jq .appId)

SPN_ID=$(az ad sp list --display-name "spn-keyvault-devops" --query [0].objectId --out tsv)
<!-- SPN_ID=$(az ad sp show --id $SPN_APPID --query objectId --out tsv) -->

### assign RBAC role to the service principal
az role assignment create --role "Key Vault Secrets User" \
   --scope $KEYVAULT_ID \
   --assignee-object-id $SPN_ID
3) Create a pipeline to access Key Vault Secrets
3.1) Create Service Connection using the SPN
Create a service connection in Azure DevOps using the SPN created earlier.
3.2) Create YAML pipeline
Create the following yaml pipeline to get access to the secrets.
trigger:
- main

pool:
  vmImage: ubuntu-latest

steps:
- task: AzureKeyVault@2
  displayName: Get Secrets from Key Vault
  inputs:
    azureSubscription: 'spn-keyvault-devops'
    KeyVaultName: 'keyvault019'
    SecretsFilter: '*' # 'DatabasePassword'
    RunAsPreJob: false

- task: CmdLine@2
  displayName: Write Secret into File
  inputs:
    script: |
      echo $(DatabasePassword)
      echo $(DatabasePassword) > secret.txt
      cat secret.txt

- task: CopyFiles@2
  displayName: Copy Secrets File
  inputs:
    Contents: secret.txt
    targetFolder: '$(Build.ArtifactStagingDirectory)'

- task: PublishBuildArtifacts@1
  displayName: Publish Secrets File
  inputs:
    PathtoPublish: '$(Build.ArtifactStagingDirectory)'
    ArtifactName: 'drop'
    publishLocation: 'Container'